May 28th 2013- Lightening Nails

Getting inspired by the summer thunderstorms? Paint your nails to match the occasion! Thanks to Just Try in Your Nail Tumblr, this fun manicure is great for a little stormy weather. Start with a black background. Then, sponge on a little white and purple for the dark and stormy skyline. Drip down the sponge on each nail in a fun pattern unique to you. Then, find a white gel pen to paint on a streak or squiggle for the lightening! Voila! Instant stormy nails.
Follow the How To info-graphic above for a visual guide.
May 27th, 2013- Jewelry Care

Jewelry care is something that is often not focused on but is an important part of fashion life. A wedding ring or favorite necklace needs to be properly cared for or they can look old and ratty. To avoid tarnishing and dirt there are a few tips every gal must know.


Following the tips above are necessary for proper jewelry care. You should try to avoid traditional cleaners and other sprays. Always put on makeup and perfumes before putting on any jewelry and only clean with polishing cloths and olive oil. Irritants or dyes to the skin are irritants to your silver and gold.

Follow each instruction above for the 4 different jewels above. For silver, visit Clean My Space and for your other pieces, it's always best to ask the stores and vendors for care instructions. Zales has very good tips for cleaning and jewelry upkeep.

For cheaper jewelry, spray them with clear gloss! Gloss your forever 21 or cheap jewelry to keep from turning colors. This also makes your jewelry hypoallergenic. Try this and all tips above for great jewelry care!
May 23rd, 2013- At Home Spa Treatments
In an ideal world, every girl everywhere would be able to visit a spa at least once a week. We all know this is not a possibility. Lucky for us, there are at home remedies that will make us think we are at a spa for a day! Follow some of the treatments below for a DIY spa experience.

These materials can usually be picked up at a grocery store or found in your pantry already! For a relaxing bath, add rosewater and coconut milk into your warm tub of water. Want moister skin? Honey and olive oil can be a deep tissue moisturizer. Honey also mixed with brown sugar is a facial scrub. For a softer lip scrub, mix petroleum (Vaseline works) and raw sugar. This will remove dead skin and moisturize. To reduce puffy redness and swelling, an egg yolk and lemon juice calm an angered face. Try one or two a week to pretend you're at your very own spa.
May 22nd, 2013- Soften the Line
Thanks to The Beauty Department, we have a mid-week tip that gets our makeup from harsh to work appropriate. This smudging technique with an addition of eye shadow is the perfect technique for blending into a subtle makeup style.

TOOLS:
Black liquid liner
Any shimmer shade that you feel in the mood for that day
STEPS:
Incrementally trace the liquid liner across the lashline from the inner corner to the outer corner. Then continue the line out and up to draw a wing.
Sweep the shimmer shadow back over the line. A thin brush or sponge applicator works.
Enjoy your new delicate look!
May 21st, 2013- Splurge vs. Steal
There is a long standing debate in beauty products as to whether drugstore brands hold up to the real high end brands. Thanks to the Life Unsweetened blog, we have which items are available at quality and steal prices.

Here is a list of products and where to buy them!
Splurge: Clinique Chubby Stick Instense Moisturizing Lip Colour Balm / Clinique Chubby Stick Shadow for Eyes / Clinique Rinse-Off Eye Makeup Solvent / Clinique Redness Solutions Instant Relief Mineral Powder / Clinique Naturally Glossy Mascara / Clinique All About Eyes Serum De-Puffing Eye Massage
Steal: CoverGirl Lip Perfection Jumbo Gloss Balm / Neutrogena Crease Proof Eye Shadow / Neutrogena Oil-Free Eye Makeup Remover / e.l.f. Tone Correcting Powder / Revlon Photoready 3D Volume Mascara / Garnier Nutritioniste Skin Renew Daily Eye Roller
May 13th, 2013- How to Remove Oil Stains

Ever have those pesky oil stains from a late night pizza get on your clothing? Well now, you don't have to throw it out! You can remove those hard oil stains from clothing without buying specialty products. For about $2.50 or less you can salvage your clothing from accidental oil.
Here's what you'll need:
baking soda
scrap of cardboard (optional)
Dawn liquid dish detergent
an old toothbrush
your regular laundry routine after stain removal

Apply baking soda to the oil stain on the shirt. Give a healthy serving to the stain. Then, brush away. You must brush for awhile in order to get the stains out. After while, you will have to reapply more baking soda to the spot until there is no more clumping.

Keep brunshing until the clumps are 100% gone. The cardboard is to place between the middle of the shirt and to keep the oil stain from leaking through. After you have brushed all you can, shake the excess baking soda off the shirt.

Next, add Dawn to the shirt and scrub. Let this sit for a few minutes and then throw the shirt in a normal load of laundry with no special instructions. NO extra wash time. NO heavy wash cycle. NO extra rinse cycle.

There you have it! Go check out Northern Belle Diaries for this post and more cleaning tips.
May 8th, 2013- Tattoo Concealer

Love your tattoos but sometimes wish you could temporarily remove them? No problem! There are home remedies and products available to cover your ink. You can buy over the counter items at Sephora and online or follow our DIY how to information below.


Three products are the best for tattoo removal. Kat Von D makes Lock It Tattoo Concealer available at most major beauty supply stores. Hard Candy also makes a similar tube and pencil called Glamoflauge available on their online store. Last but not least, you can try Tat Jacket in its very own brand.

When the time comes to conceal a tattoo for a job interview or other important event you can use the DIY method. Use a red lipstick covering the outlines, pat on a light concealer, using a setting powder pat on your skin tone concealer, and clean up any mistakes using baby wipes to remove excess concealer. Use a fluffy brush and smooth it out with foundation powder. Watch the Youtube video for more details!
May 7th, 2013- Colored French Tips

French manicures are a timeless look. They go with everything and elongate your nails by extending the tips. Now, you can have a spring or summer twist on an old classic: vibrant colors. Neons and glittering colors can tip your french manicure. This new trend is funky and daring for your days out of the office.


Blue is a frosty transition from white to blue. You can select a Tiffany blue for a classy twist. This looks darling with a fancy ring or glittering base. A royal blue is also fun for a basic ensemble. You can stack your blues or add some pink to flare up the blue hues.

Hot reds are red hot for summer. They can match a picnic blanket or a red lip for summer. A red tip looks sexy with a basic nude or plain bottom. Red is a classic look and that is darling with white, black or polka dot retro looks.


Not exciting enough for you? Try a different color for every nail! Paint the rainbow! You can have a nude or black base to mix it up. Line your tips with silver or a basic color to make them really pop. Happy painting.
May 4th, 2013- Maidenform Bras

Maidenform is an under-garment company that has serviced women all over the globe. It's comfort and style has the company booming but what has the girls really loving this brand is it's backless collection. Elaine Cato, the 40 year old mother of two, invented the backless creations on this site for women just like her. According to her USA Today interview, she is just a woman who knew how to sew and needed a bra for a New Years Eve dress.

Cato went on the show American Inventor to try to win the money she needed to market the bra. After coming in runner up, Maidenform bought the bra and the patent and is now selling it worldwide for $32. Ads for the creation are running in Cosmopolitan and Glamour magazines. Her one simple idea has changed her financial life and women's support forever.

You can find the backless creation that suits you and your spring dress look on the Maidenform website under the section of Backless/Adhesive Bras. They are long lasting and far more affordable than many of the options at Victoria's Secret. Thanks to Cato, you're ready for spring!
May 3rd, 2013- 5 Top Nail Polishes for Spring

Thanks to the Beautenize website, we have a leg up for spring nails! Inspired by runways, magazines, spring collections and designers these five colors have been deemed the most popular for use this season.
Find all five below at the links or in stores:
Enjoy your weekend with trendy nails for the season!
April 30th, 2013- 4 Makeup Tips for Spring

Thanks to Yet Another Beauty Site, we have four top makeup tips for spring. Runway trends gave us four hot eye tips and debuted the matte trend that we've had our eyes on for months. This season there are some translatable trends that you can make quite wearable for everyday. Try out some of the ones above.
The bold coloured eyeliner is a trend seen on the Kenzo show. On the runway, the trend is much more bold, but if you tone it down it becomes a wearable trend. The bold eyeliner adds a nice splash of color to your usual makeup. You can do this in different ways, for example with an eyeliner pen or you can just use an eyeshadow in a bold color. Wet your eyeliner or slanted brush, rub it on the side/corner of the eyeshadow and then use it as an eyeliner.
Copper coloured eyelids were seen on the Chloe show this season. Copper is a gorgeous color that complements a lot of eye shades. Use a kohl pencil in a copper toned colour and then a pigment or eyeshadow in copper on top.
Aqua coloured lower rim is a fast and easy way to get some color to your eyes! The trend was seen on the Stella MacCartney show. This trend feels really youthful and summerlike. Keep the rest of the makeup light and subtle. The eyeliner should steal the show.
A big trend for spring and summer are matte lips. And it was often in redish colours on the runways.
Find out matte lip posts below for more tips and hints on this trend.
April 24th, 2013- Marble Manicure

Marble manicures are a fun way to mix up your nails for springtime. All you need is a mix of colors you want on your hands. You can swirl on your nail or combine the colors with water to create a swirling effect. This tie-dye effect is a retro way to show your bohemian side.


The most popular way to rock this swirling trend is to mix vibrant colors. Pick some of your favorites for a hot summer day. This very casual manicure is perfect for a concert, picnic or daytime outing. Be creative with pastels, neons and brights.

If you're more of a neutral lover, the looks above are great for you. Browns, whites, and shimmering golds are great for this swirl look. You can shop for pale colors or buy a pre-made swirl set like the one shown above. You can DIY or go to Sally Beauty Supply to achieve the looks above.


Pinks are a lovely way to show your spring fever. You can go with a straight pink marble or mix in other springtime pastels like yellow and blue. Hot pink, maroon and baby pink create a twisted medley of femininity. Work in some red if you're feeling bold.


Blue and green colors also reflect the new season by mimicking the sky and foliage. Blue mixes in well with purple, white and other metallics where green mixes best with yellows and browns. Pick your favorite from the looks above!
April 21st, 2013- Simple Lining Manicure

A simple manicure can be turned into something extraordinary with a simple accent: the line. A simple line can turn your boring manicure into a fun classic trendy nail set. You can use the Tiffany & Co. inspired look above or try a more modern twist with metallics and nude. The simple line is easy to achieve and matches almost anything!


You can try this easy line addition to any manicure. Traditionally, French manicures only paint the tops of your nails white. Now, you can liven it up by stenciling a colored line boarder! Select a color of the month or a shade that matches a holiday this season. It adds a much needed flare to your classic look.


You can also play with black as a background or lining color for this trend. Make a retro anti-French manicure by painting your tips black. You can add one color lining or any color for each nail you want! A black line is very vintage across a plain base coat. Try pinstripes or a double like the look above.


Like the look above? Try this DIY tutorial for your next manicure. If you want, you can change up the colors to reflect the new Spring season! Happy painting.
April 19th, 2013- Insta-Gel Nails by Sally Hansen

Sally Hansen has done it again. The company has released a revolutionary nail product that will have you rethinking getting a professional manicure. The new Insta-Gel Nail kit allows you to have a flawless gel manicure at home. Gel is the hottest nail trend because it lasts longer and doesn't do any damage to your real nail.

The kit comes with:
· 1 Mini LED Lamp
· 16 Gel Polish Strips
· 1 Gel Top Coat
· 2 Nail Cleanser Pads
· Cuticle Stick, File & Buffer
· Instruction sheet
To apply the manicure, all you have to do is apply the strips to your nail, paint a top coat over the strip and place your nails under the LED lamp. Three simple steps for an at home gel manicure! Follow their How To video if you need further tutorial.


Sally Hansen has 24 colors for you to choose from. Select your favorites here. You can buy the entire kit for around $30 at stores like Target and Walmart and the strip colors are about $15 for refills. Invest in this product and you'll save a bunch of money on your monthly/weekly manicures! They make great gifts too.
April 13th, 2013- Home Remedies for Black Head Removal

Well Body has given us some tips on how to remove those pesky black heads without expensive products or even more expensive trips to the dermatologist. You'll be shocked to find which ones you already have around your home!

Almond or oatmeal – Mix either oatmeal or almond powder with just enough rose water to make a spreadable paste. Apply it to your problem areas with your fingertips first and then apply it to the rest of your face. Let it set for about 15 minutes and then rinse your face with cold water
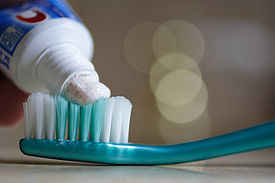
Toothpaste – Toothpaste is an effective blackhead and whitehead remover. Apply a thin paste to your infected areas and let it sit on your face for at least 25 minutes. You will probably feel a burning sensation when you apply the toothpaste, but this is normal and will pass. Once you remove the toothpaste, the top of your blackheads and whiteheads will disappear, but you still need to thoroughly wash your face to remove the buildup underneath. Repeat this home remedy every other day for two weeks.

Yogurt - Mix three tablespoons of plain yogurt with two tablespoons of oatmeal. Add one teaspoon of olive oil and one tablespoon of lemon juice to the mixture. Stir the mixture thoroughly and apply it to the effective area of the face. Let the mixture sit for five to seven minutes then rinse off with cold water.

Lemon -Wash your face in warm water. Then, squeeze the juice of one lemon into a bowl. Add in a pinch of salt and stir the mixture. Apply the mixture to your blackheads and whiteheads. Leave the mixture on for approximately 20 minutes and then wash your face with warm water again. OR Lime – You can also use equal parts of lime juice and cinnamon powder and apply this mixture to blackheads. Leave it on overnight and rinse it off in the morning.

Tomato – Tomatoes have natural antiseptic properties that dry up whiteheads and blackheads. Peel and mash a small tomato. Apply the tomato pulp to your blackheads and whiteheads before going to bed. Leave the tomato pulp on your face while you sleep and then wash your face in warm water in the morning.

Baking soda – Prepare a mixture of equal parts of baking soda and water and rub it onto your face or other body areas prone to blackheads. Leave it on for 15 minutes and then rinse it off with warm water.

Honey- Honey is also good for removing blackheads. Spread honey on the affected area and remove it after 15 minutes.
Try one of the items above to kill bacteria and remove your black heads!
April 10th, 2013- Callus Relief

There is nothing more unattractive than tough, callused feet. But how can you avoid them when you are running around at work all day or working out at night to keep your body toned and healthy? Other than spending hundreds of dollars getting pedicures, there is a home remedy that is cheap and effective. Ladies, write this down because you'll need this recipe for summer flip flops.
According to Prevention magazine, you can use baking soda to get rid of these nasty calluses. Follow their instructions for flawless results:
"First, soften the calluses: blend two tablespoons of baking soda in a basin of warm water and add a few drops of lavender oil. After a nice long soak, scrub them away using three parts baking soda, one part water, and one part brown sugar. Follow with an application of a rich moisturizer and a warm towel foot wrap. Let sit for 5-10 minutes."
Now go beautify your feet!
April 8th, 2013- Steal Her Makeup

Allison Williams is the bright and shiny new "It Girl" from HBO's Girls. The daughter of news anchor Brian Williams, is a talented actress, singer and fashionista. Her style has women raving and her voice debuted on a recent story line as her character, Marni, belted out tunes on a season 2 episode. Everyday women idolize her style and her makeup. Now, you can copy her look with the products above!
Eyes: Using Elf eye liner, Sonia Kashuk shadow and Eyeko lashes create the perfect movie star look.
Brows: Define your brows with Too Faced brow kit. The look is easy with a pencil and stencil for plucking and tweezing.
Lips: YSL balm and lipstick combine to make the perfect pink pouty lip. This style is perfect for spring.
Cheeks: Josie Maran makes a fabulous blush that will make you looks healthy and youthful. Combine with a daily Sabon moisturizer to plump up your skin.
Williams is also a fan of clear skin. Her endorsement of Simple Skin Care line has revealed her secret to flawless, youthful looking skin. Check out her commercial for the product and try some of their products today!
April 4th, 2013- Texture for Spring

This just in: the textured nail is trendy for April! That's right girls, give your nails a little grit this season. We love the raised matte look for these warmer days and many nail laquer brands have been putting out textured polishes. This tactile paints have been showing up on manicures everywhere.


The best colors for the textured look are lighter colors. This is perfect because pastels are adorable for the warmer spring weather. Pinks, blues and purples look great with any mini-dress. You can mix and match, paint a single accent nail or do a full pastel look. The lighter the better because more of the texture will stand out from the nail.


If you're growing impatient for summer, you can start the trend early by doing neon colors! Red, green and orange are fun colors for the beach or a great outdoor concert. Milani and China Glaze make the two best lines of this texture collection. They have a wide array of colors for you to choose from so you, and your manicure, will never get bored or tired.

If you want the look but prefer to be a little more glammed up with your texture, you can but Zoya's version of the trend called Pixie Dust. Not only does this polish give you that textured look, it incorporates glitter into the color. You can look sparkled and textured all at once. Now go out and rough it... literally.
March 30th, 2013- March Madness Nails

March Madness is in the throws of its season. The Sweet Sixteen is getting serious and the competition is fierce. Everyone is wondering who will be matched up in the Final Four. Girls and guys everywhere have their favorite team and are sporting their team pride in any way possible. For any gal that has a flare for detail, you can sport your March Madness love in a unique and fun way.


Basketball nails are a cheeky way to show your fandom. You can have realistic basketball inspired nails like the ones above or make your own creation. Orange, light brown, black and dark brown are the colors needed for the looks above. Find a tiny brush and recreate the manicures above. You can also create a tiny net with loofa netting and top clear polish.


For the more adventurous nail connoisseurs, you can create a custom manicure by painting each nail differently. Mix a combination of balls, netting and your team colors to create a unique look. You can paint every other nail an alternating pattern. You can paint basketballs on top of a white, blue or any other backdrop color.

For the more subtle basketball fans, you can create a single accent nail inspired by the sport. Show your March Madness passion with a tiny basketball on one solid manicure or paint two nails that compliment the orange color.


If you're not a fan of the basketball mani, you can show your support by painting your nails the color, logo or name of your team. The looks above are just a few examples of how to show your team spirit. You can mix up the pattern or color of your favorite team. Paint a fancy french manicure or a fun tipped creation.

Follow the how to images above to create your own manicure at home. Start with a brown or orange base and decide dots or no dots. Create the basketball lines with a tiny black brush or a net with a webbed fabric. The DIY Covergirl Madness Mani is also a great option and really simple to do yourself. Be a real fan and mix it up March Madness style.

March 27th, 2013- Ear Piercings

Ear piercings are a fun way to update your look. Whether you have a preppy style or are an all out biker chick, you can select the piercing that's right for you. With over 8 places to pierce, your jewelry options are endless. You can create your own unique combination of holes or simply choose one!

A new piercing is perfect for the warmer seasons. During spring and summer, you'll want to pull your hair up and back or cut it all off to show your neck and ears off. You can create patterns with studs or have two linking piercings with a chain for a fresh new look.


Having a great number of piercings is an overwhelmingly Bohemian look. This trendy style is perfect for cropped tops and ripped jeans at a concert. Although the look is unprofessional, all you have to do is take your jewelry out or wear clear studs to work. Your hair can even cover up the majority of your piercings. Selecting studs with significant meaning is a great way to show your style. A cross, spirit animal or favorite flower can reveal something about your persona.

A new trend in piercings is the triple hole. Getting 3 piercings all aligned is a fresh new way to spruce p your jewelry passion. Little matching studs or an arrangement of big to small look like an adorable constellation in your ear.


When going to a piercer or tattoo parlor, you need to be crystal clear about what you want pierced. Use the infographics above to decide and name your next new piercing for spring and summer. Be sure to clean them when new and sleep on the opposing sides when going to bed.
March 25th, 2013- Ombre Nails

The ombre trend is cute for hair this season. Now, ombre nails are all the rage for the latest coloring trend! This manicure is a way to achieve the ombre trend with little risk. If you don't like it, you can change it! You can paint almost any color that you want and all you need is 5 bottles of nail polish you probably already have.


Great colors for this trend are various shades of pink and red. These happy spring colors are adorable with floral patterns and add a splash of color to your wardrobe. The colors show you are ready fr the flowers to start blooming and the foliage to come alive! You can mix pink and red and whites to attain the perfect gradient.


Sky blues and fun purples also look darling in gradient ombre fashion. You can move from dark to light or light to dark from your thumb in. As long as the colors work from darkest to lightest in some fashion. You can also create custom polishes by mixing white polish in with a dark shade of purple or blue!


Other fun spring colors include green and orange. Although these are less popular for the trend, these colors still stand out and create a fabulous manicure! Mint and turquoise are great summer colors and the orange will remind you of sunlight while you're stuck in a dingy office. Play with these colors for a festive weekend or night out.

If you are more of a subtle dresser or simply don't have the flare for color, you too can participate in the ombre nail trend. Browns, blacks and nudes make for a classy ombre look. You can play with these muted colors to get the funky edge this manicure gives. Paint to your heart's desire!
March 17th, 2013- Animal Makeup

The warmer months are coming and summer fanatics everywhere are excited. To celebrate the trees coming back to life and the animals coming out of hibernation, our makeup is inspired by animal prints. Tropical animals are the best for this trend because they have the most vibrant and wild patterns but almost any animal will do! Play around with your eye makeup to achieve some of the following looks.

The zebra look is stunning for a wild and crazy sunny party. All you need is two colors and an attitude to pull it off. You can find white eye shadow at almost any makeup store to achieve the look. First apply white as a base and then create zig zags with black eye liner! This look is that simple.


Leopard print is hot this season, so why not apply this trend to your makeup! Cheetah or leopard eyes are a fun way to stay up with the trend and show your wild side at night. Browns, golds, blacks and yellows are essential for this look. You'll need a steady hand or a friend to complete this look for you. You can do the corners in spots or your entire lid!
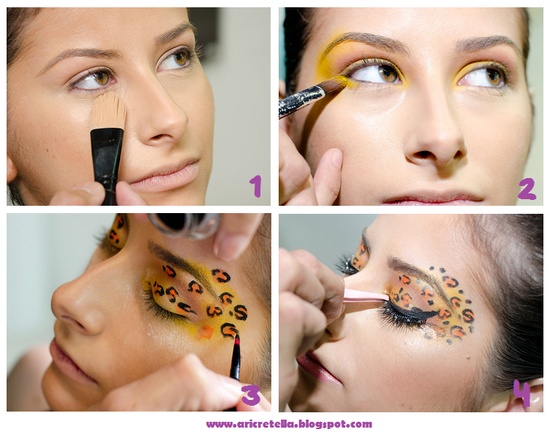
You can follow the tutorial above to get the look. First, paint on a yellow base in the corners of your eye. Second, draw open half circles with a black eye pencil and use a small brush to fill in the orange. Next, highlight all the spots with some white color and you're ready for a night on the town.

If you're more of a wild and crazy colorful dresser you can try mixing up your colors and using some neon. This Lisa Frank inspired look above will be a show stopper at any event. Try bright greens and pinks or a vibrant blue with purple. This youthful look will immediately take you back to your childhood trapper keeper.


You can also get inspired by some of your favorite animals. The poison dart frog is rare and only found in tropical climates. Try to copy the look above for a fun night out. You can even use eye gems to replace the spots if you like!

You can choose unique but recognizable animals as well. A peacock is a newly hot look inspired by the Katy Perry song "I Want to See Your Peacock"and looks stunning with black, blue or green ensemble. A clown fish is also a fun and playful look or you can mix and match different animals!


If you like mythical creatures, you can try the looks above. Cartoons use some amazing color palates and can inspire your day to day makeup looks. Find a real or fake animal to inspire your today.
March 16th, 2013- Bronzing 101

Listen up ladies because we're about to shed some light on some very important areas.. Literally. Bronzing is meant to show that you have a sun-kissed glow all year long, even in the tinter time. This littel beauty secret is ancient. Women have been using bronzer for decades but we're here to make sure you're doing it right! Sometimes, women can overuse bronzer or apply is to the wrong areas of the face, sometimes making it appear as if your face and neck were two different colors. The trick: you want to bronze where the sun naturally hits your face.

Bronzer can do amazing things for your look. If you're usually super pale, this tool can make you look youthful and full of life. Bronzing in the wrong places can make you look like an alien, however, if you bronze only on the nose, chin, cheeks and highpoint of your brow, you should master the talent and look more like the gorgeous after shot above.

First, you want to select a powder that matches your complexion. Too dark will be obvious and too light can make you look even paler! Compare pictures of you in winter and summer to see what shade your skin naturally turns in the sunlight. The first place you'll want to apply a light coat of bronzing is your forehead. This is where the sun hits almost immediately at the beach!


The temples, bridge of your nose, cheeks and chin are the highest points of your face. The nose especially gets most of the sunlight and is always in danger of getting burnt! The temples will help balance out your high points to avoid making you look sunken in.

Finally, you can't forget about shading your jawline and neck! This is the biggest oops in beauty. Many women forget this step and it can make your neck look way darker than the rest of your body! Avoid this by blending and shading your new dark color into your neckline. Happy bronzing ladies!
March 14th, 2013- 20 Hot Beauty Tips

We've got a blog crush on Lady and the Blog! This site just launched a brand of posts that releases beauty tips from readers just like you. Real women who use real working tips for looking fabulous. You can't always trust magazines for their "beauty secrets" because you never know who is paying for the content or who endorses their magazines. Blogs have the ultimate power to produce the truth about what works for beauty. Here are the 20 tips that are most recommended this month.

Beauty Tip #1: Have cracked feet? Put Vicks Vapor rub on them before bed. Cover with socks.
Beauty Tip #2: Tend to your cuticles. Use Vaseline or olive oil every few days to make sure they stay soft.
Beauty Tip #3: Put your perfume on first and then your lotion. Your scent will last longer.
Beauty Tip #4: When applying facial moisturizer, be sure to circle pat upwards. Never pull down on your skin.
Beauty Tip #5: Primer is important. It’s not just an add on. If you are in your 30s or older… be sure to apply prior to foundation.

Beauty Tip #6: Go to sleep with a clean face. Wash your face with soap, apply toner and then go to bed. Don’t add night cream unless you absolutely need it. Your skin needs to breathe.
Beauty Tip #7: When applying moisturizer, bring it down to your breasts. You have to cover your entire neck. To be safe, I always also cover the part of my breasts that are outside of my bra.
Beauty Tip #8: It’s an oldie but a goodie – drink water. Lots of it.
Beauty Tip #9: When you blow dry your hair – do not flip all the way over to add volume. Push your hair forward from the back of the top of your head. That’s where you want the volume – not by the base of your neck.
Beauty Tip #10: Masks are your friend. Do one at least once a week. If you have the time, aim for 2 or 3. Don’t have money to buy one? No problem! Make one at home using the food in your kitchen. There are plenty of recipes online to choose from.
Beauty Tip #11: You deserve to take care of yourself. Remember that.
Beauty Tip #12: Want to make your eyes pop? Line your bottom lids by your tear duct with nude eyeliner. It will push out your mascara and make your eyes pop.
Beauty Tip #13: Don’t be afraid to mix foundations. I use two different colors to come up with my color.
Beauty Tip #14: I know those baby wipes are really easy to use, but don’t use them to take off makeup. They are bad for your skin.

Beauty Tip #15: Dry shampoo is your friend. If you haven’t started using it yet… you are missing out.
Beauty Tip #16: It’s not only about black or brown when it comes to eye makeup. Get purple, green or gold! It will make the world of a difference.
Beauty Tip #17: Laser hair removal works and it’s the best thing since sliced bread. It will change your life!
Beauty Tip #18: Tinted moisturizer is a great product. I wear it 90% of the year. It’s a two-in-one for busy moms and gives just enough coverage to get through the day.

Beauty Tip #19: Don’t go to the bathroom without wearing mascara. It’s like clothing for the face. You can’t leave your house without it.
Beauty Tip #20: Want your manicure to last a little longer? Apply clear polish every few days.
There you have it ladies. Trust one another and go forth to beautify!
March 12th, 2013- DIY Matte Lipstick

Matte lips have been super popular as of late. Women love the plush color and the non-shine look that comes along with the matte color. Now, you can create your very own matte lips with your favorite colors! All you need is a lipstick and matching blush color. Follow the how to below to save time and money getting the matte look.

All you need for this trend is any lipstick, gloss or tinted lip balm you like! The brand doesn't matter; you can use any color you have in your makeup drawer. Next, grab a matching blush color. This specific tutorial uses a Matchbox brand but you can use your own favorite!

Step one is simple and most women do it everyday: simply apply your lipstick as you naturally would. Using a lip pencil balm is the most effective way to guarantee finding all the nooks and crannies in your lip corners!

Next, smear your finger with your matching blush color. Then, simply press and stamp your finger all over your lipstick. Continue as needed. You may need to reapply this look throughout the night but the matte look will be flawless and illicit many compliments about your original color! Check out the before and after picture for a shine-less matte lip!

March 8th, 2013- Spring Eyes

Flowers are starting to bloom and forage is starting to come alive! It's springtime in the States and we could not be more excited. The colors of spring have always inspired fashion and makeup for the season. The bright pinks and purples of flowers and the blue of the clear warm sky has been worked into clothing lines and bags for years now. Makeup is taking a hint. Spring makeup is all about color! Here is an example of how to achieve the perfect springtime eye.

First, pain on a thick pink eyeshadow. You can do bright pink or a pale plush. The brighter the pink, the more of an evening look and the duller your ensemble should be. You want to make sure your eye is clean and naked to be ready for the first coat. There is nothing worse than caking on new makeup over old makeup.

Second, you'll want to blend a pale shadow over the pink. A subtle brown or peach looks flawless to blend the pink into your natural eye shape. Having a harsh line between your brow and lid is never appealing, the pale brown helps soften the line.

To kick up the look, place some line on the top of your lid. A pencil is the best tool for this trick. The harsh line makes your eyes pop and gives your lashes an extra dark color. Placing liner on the top of your eyes make them appear bigger and sexier.

Next, you'll want to make sure the bottom of your eye is clean and clear. Then, you can either apply a bottom line of eye liner to the lower lid and blent or simply blend a darker shadow underneath you eye. This will frame your iris and make your color pop.

Finally, add some complimentary blue to your look! Take an electric blue shadow and dust the bottom lid near the corner of your eye. Add some mascara and you've done it! This surprising twist gives you a unique look that is perfect for spring. The finished product will turn heads and get your gal friends asking what you did to look so flawless.

March 6th, 2013- Punch Colored Spring Lips

Spring is upon us. New weather, new trends, new makeup! Pretty punch colored lips are hot for spring. These plush puckers are great for sunny days, iced tea and sundresses. Orange, magenta and pinks are the three colors to watch this season. SheFinds exposes perfect colors as debuted by Giles and Moschino on their runways 2013.

Moschino's spring line loved orange lips for 2013. The Guerlain Rouge lipstick in the gold tube is only $35 and looks amazing on and off the runways. The orange looks dashing with black, white and other spring linens. The Satin orange from Make Up For Ever is only $19 and looks luscious and supple on a thin or thick lip.

Hot pink lips were all the rage on the Giles runway for this year. This lip looks great with any colored dress and is best with plain eyes or all out smokey eyes. The MAC product above is available in stores now and Obsessive Compulsive Cosmetics makes a lip tar that fits perfectly in your pocket. Either option is affordable and long lasting.

The third and final color, magenta, looks great on all complexions. Kelly Osborne uses this color as a stapled favorite. It looks chic for a night out or a girls night and dinner. again, Make Up For Ever makes an affordable stick that goes on cleanly and stays for hours. The chocolate raspberry Fashion Fair lipstick is available for only $15. Get the looks today and try out all three!
March 5th, 2013- DIY Peel Off Mask

Ever want a fresh skin peel but just can't afford it? Doesn't everyone?! Finally, we have a recipe for a DIY black head removal, peel off mask. The blog Beauty Diva India has unlocked the secrets of a flawless mask. Want the tips? Here they are.

All you'll need are egg whites and tissue paper! That's right. This amazing mask that removes black heads and gives you glowing skin is only two ingredients. Take the white of an egg is a small bowl and
beat it slightly. Now using a face pack brush apply the egg white on your face
and neck, avoiding the eye and mouth area. Take a thin tissue and cut out holes
for your mouth, eyes and nose. Place it gently over your egg white brushed
face, pat gently. Or you could tear the tissue into small pieces and place on
your face one by one to cover fully.
Now apply another layer of egg white over tissue and leave it on to dry. When
completely dry, gently peel-off the tissue or tissue pieces in an upward
direction from the face. Check out all the blackheads on the tissue! Wash off with tepid water and apply a mild
moisturizer.

Do not use gift wrapping tissues. Use the ones that
you would generally use to blow your nose.
Take
off the mask after its completely dry by peeling it from downwards to upwards
direction.
Please be patient
because it takes time to dry off completely.
Use only fresh/raw eggs.
For
oily skin use twice in a week and for dry skin use once in a week or twice in
10 days.
Finally, the drying
time depends on the season/weather/environment. in summers it would dry soon
enough (15 mins maybe), in winters (25-30 mins maybe) and in airconditioned
environment is takes a little more time to dry.
Try it out for flawless skin today!
March 2nd, 2013- Faux Shaved Hairstyle

Spring concerts are here! It's time to get your funky side to show. What a better way to do this than with a shaved side cut. Now don't worry, you don't need to fully commit. This chic styling tip above is a great way to get the look without the buzzer.
Step 1) Fully blow dry and style your hair straight. You can do this as you naturally would. Then, part your hair to the side.
Step 2) Create an extreme side part by taking a section on your thinner side and throwing it over to your hair heavy side. Pick the left or right; it doesn't matter.
Step 3) Using tiny rubber bands, bobby pins and side clips, twist your hair into tiny side twists along the side of your hair. The tighter the better. You'll want to show part of your scalp and you don't want the twists to come loose. Two or three small sections is all you need to create the full look.
Step 4) Enjoy! You can use hair spray and gel to keep your part swept out of your face and avoid fly aways from the tight twists.
March 1st, 2013- 10 Commandments of Lipstick

The right lipstick can pack a serious punch for your style. A pouty lip can make or break your ensemble and draw attention to your chic attire. It's so important that we get our lips right and attain that flawless pout we all deserve. Follow the rules below for the perfect lip.

Always start with a clean lip. Gently exfoliate dry skin by rubbing a damp washcloth on the area. Know your formulas. Matte can be long lasting and can dry out your lips. The wetter lipsticks don't last as long so try a combination! Start experimenting.

To really make your lips stand out, use a pencil. Lining your lips neutralizes their natural pinkness so the lipstick will resemble the color in the tube. Also, a brush will help lip color last longer. Take the extra time to apply with a brush.

For blotting, you want to dab your lips between applications by gently pressing a tissue to one lip at a time. This next rule may be the most important: Never EVER get lipstick on your teeth. Always check a mirror between applications to avoid this embarrassing "don't".

To outline the curves of your lips, applying a light pencil to the upper rim will help draw attention to this visually stimulating part of the lip. Finish your lip off with a top gloss. It will boost your shine and make your lips look shiny.

Play around with different colors! Don't be afraid to wear a nude lip. It can be classic and stunning. Finally, there is a red for every skin tone! Lighter skins look best in hot red, olive skins look best with orange tints and dark skin can wear a pink like no one else. Now go try some of these tips above!
February 28th, 2013- Natural Beauty Trends

Hot beauty blog Inspiring Pretty has released some natural beauty secrets that every woman will love. There are treatments for hair, skin and health all in one list. What's the best part you ask? They are all home remedies created by everyday foods you have around your house!

Oil and vinegar are two of the ingredients for these secret tips. Here are three tips blew for your hair and skin that will blow you away simply by using household oils:
Replace Conditioner with Vinegar
To get rid of the usual problems with hair: build up, dullness and just lackluster, replace your conditioner with vinegar 1-4 times a month, depending on your hair type. Just use it as you need it. And, don’t worry about buying the best stuff for the best results, common white vinegar will do the trick as well as any other vinegar.
Olive Oil as Hair Moisturizer
It’s easy to see how oil can moisturize your hair. It’s simple to use as well. Simply cover your hair in olive oil and leave it in for 30-45 minutes. You can also wrap it in plastic wrap to keep it from dripping. Some also believe it enhances the effect.
It’s easy to see how oil can moisturize your hair. It’s simple to use as well. Simply cover your hair in olive oil and leave it in for 30-45 minutes. You can also wrap it in plastic wrap to keep it from dripping. Some also believe it enhances the effect.
Apple Cider Vinegar for Cleanser and Toner
This eliminates dead skin cells easily, so you can use in lieu of expensive toner. Some can use this straight daily, others need it to be diluted a bit with water. Just pay attention to your skin and use the concentration that works best for you. That’s all there is to it!
This eliminates dead skin cells easily, so you can use in lieu of expensive toner. Some can use this straight daily, others need it to be diluted a bit with water. Just pay attention to your skin and use the concentration that works best for you. That’s all there is to it!

Honey is the nest natural ingredient for some of these tips. We already know that Burt's Bees products are amazing and super healthy for your lips. Now, you too can use honey at home to attain beauty perfection!
Brown Sugar and Honey Facial Scrub
This is probably my favorite one. Brown sugar exfoliates the skin ridding the pores of all dirt, oil and dead skin cells causing blemishes. Honey is naturally antibacterial, so as the brown sugar scrubs away the things clogging pores, the honey cleans out the sources of the buildup to prevent future breakouts.
This is probably my favorite one. Brown sugar exfoliates the skin ridding the pores of all dirt, oil and dead skin cells causing blemishes. Honey is naturally antibacterial, so as the brown sugar scrubs away the things clogging pores, the honey cleans out the sources of the buildup to prevent future breakouts.
Smooth Fizzy Hair With Honey
Add a tablespoon of honey to a liter of water. After shampooing, rinse your hair with this concoction to tame your frizz.
Moisturize Skin With Honey and Olive Oil
Honey holds moisture extremely well and olive oil hydrates well, too. Mix equal parts of olive oil and honey (and add a dash of lemon juice if you’d like) to create a pasty lotion. Rub it onto the dry skin and let it sit for 10-20 minutes. Your skin will be hydrated for plenty of time to come afterwards.
Honey holds moisture extremely well and olive oil hydrates well, too. Mix equal parts of olive oil and honey (and add a dash of lemon juice if you’d like) to create a pasty lotion. Rub it onto the dry skin and let it sit for 10-20 minutes. Your skin will be hydrated for plenty of time to come afterwards.

We've all used lemons to spruce up our foods, create lemonade or to lighten our hair in the summer; now we can use lemons and other fruits for beauty reasons!
Lemon and Egg Facial
Have red splotchiness on your face? Soothe both symptoms away easily by mixing together one egg yolk and the juice of one lemon into a paste. Cover your face with it and leave it on overnight. If this seems like too much work, leave it on your face for an hour. You might not get the optimal results with this amount of time, but you will see a difference.
Have red splotchiness on your face? Soothe both symptoms away easily by mixing together one egg yolk and the juice of one lemon into a paste. Cover your face with it and leave it on overnight. If this seems like too much work, leave it on your face for an hour. You might not get the optimal results with this amount of time, but you will see a difference.
Degrease Oily Hair With Lemons and Aloe
Mix together 1 tablespoon of lemon juice and 1/2 teaspoon aloe vera. Mix the mixture in with a normal serving of shampoo. It will get rid of your oiliness in your hair with one shower.
Mix together 1 tablespoon of lemon juice and 1/2 teaspoon aloe vera. Mix the mixture in with a normal serving of shampoo. It will get rid of your oiliness in your hair with one shower.
Lemons or Oranges for Fine Hair Hairspray
Use Lemons for dry hair and oranges for a stronger hold. Chop up the entire piece of fruit in a bowl as to not lose any juice. Boil the fruit with 2 cups of water until soupy or to when the liquid has been significantly reduced. Strain through a cloth and pour into a spray bottle for use. The citrus will hold the hair and not damage it due to the fact that there is no alcohol.
Use Lemons for dry hair and oranges for a stronger hold. Chop up the entire piece of fruit in a bowl as to not lose any juice. Boil the fruit with 2 cups of water until soupy or to when the liquid has been significantly reduced. Strain through a cloth and pour into a spray bottle for use. The citrus will hold the hair and not damage it due to the fact that there is no alcohol.
Finally, oatmeal is also a natural beauty tool. Most women and men keep this in their pantry for breakfast or baking needs. But you can create lovely works of beauty with this natural product.
Soften Skin With Oatmeal
There are many concoctions and mask recipes that involve oatmeal, but you can use oatmeal by itself to help your skin. Ground up about 1 cup of oatmeal using a blender or coffee grinder, and add it to bath water to soften skin to baby-like quality.
There are many concoctions and mask recipes that involve oatmeal, but you can use oatmeal by itself to help your skin. Ground up about 1 cup of oatmeal using a blender or coffee grinder, and add it to bath water to soften skin to baby-like quality.
Now go home into your cupboard and try them out!
February 24th, 2013- Evil Eye Nails

Evil eye is the trend of this week. How better to rock the trend than on your nails! Evil eye manicures are fun and fearless for the transition to spring. You can do them yourself in an array of styles or treat yourself to a salon day to paint on a protection from evil spirits!


Evil eyes can go on every nail. You can paint a simple single eye on every nail with a white, blue and black polish. Choose any color for your base. Blue is the most popular and traditional for this trend. If you're feeling more bold or need extra protection from evil, you can paint multiple eyes on your nail.

The most popular manicure for this trend is the single nail accent eye. Paint an eye on your ring finger for a fun addition to your mani. You can even paint the nail a different color beneath the eye! This look is simple, fun and boho chic.


If you want an outrageous look for those sunny days, find a bunch of colors for a multicolor mani. Different eyes give different virtues or powers. An array of color can give you strength and protection for your day. For added flare, add lashes or fun triangles to your evil eye manicure. Follow the DIY instructions below to make your own evil eye nails.

February, 23rd 2013- Galaxy Nails

Galaxy nails are hot for the winter-spring transition! Galaxy is a term that refers to a dark mixed pattern that looks like space or an actual galaxy. The blues, blacks and purples all swirled together gives an endless space effect. The look is best with a plain ensemble and subtle jewelry.

The galaxy trend has many different styles. You can go super dark and have a blue or purple gradient. You can have a more cartoony feel with brighter paints and detailed stars or you can swirl your favorite darks together and have a sparkle over coat. Either way, all the looks above are on trend and fierce.

The galaxy look is simple! Select your favorite space colors and mix. The easiest way to create the star look is to wait until the base dries and place small white dots atop your manicure. The procedure is super simple and looks chic. Splatter paint or simple white out dots complete the look.

The darker the better for this trend. You have to be bold and go all out. A black base is the easiest was to get started on your bold nail design. Buy some yellow and pink polish to spruce up the galaxy or balance the darker shades out. Follow the How To images below to complete the look!


First, start with a dark blue or black nail. Layer purple glitter with small flecks onto. Use a sponge on white polish to focus on one area and lightly blend out. The white will be a focal point. Then, sponge on light green to give the white depth. After this, repeat this step with purple and light blue. Sponge on some black to the corners of your nails and finish with a layer of glitter and white! Still confused? Use the detailed image below to have the galaxy at your finger tips.

February 21st, 2013- Cat Eye Lens Trend

Cat eye glasses are fun and fearless for spring. This new lens trend is popping up everywhere! The pointed tips make a woman look feminine and chic. Kate Spade, Dior and Tory Burch all make fabulous sunglasses that suit this trend. They are well worth the investment.

This trend is undoubtedly vintage. In the fifties and sixties women loved this trend! They were constantly wearing these shades with spring dresses and one piece suits to the beach. Ray Ban and Sundae Girl even put out ads to inspire women to buy this item. The resurgence of this trend definitely has something to do with the hit show Mad Men. This romanticized style is coming back into modern trends.

Models, actresses and singers are wearing this trend like mad! Miranda Kerr and Rihana love their cat eye shades for casual daytime wear. Kourtney Kardashian is most associated with this trend. Kourt loves her cat eye lenses on reading glasses and a number of sunglasses sported on her hit reality television shows.


The two most popular styles are plain black and tortoise. Often times, the tortoise can be fused with a leopard print. Although both styles are subtle, they are very different. You can wear the plain black frame with almost any outfit! The cat eye creates a feminine look that is flirty and sophisticated. The printed lens is also versatile but should be worn with simpler patterns and classic plain ensembles to not over shadow the look.

The cat eye style has transformed clothing style as well! These modern looks always have a vintage twist to them as inspired by the fifties look. A huge pump or horizontal stripes are a great homage to the retro look. A tight ballerina bun reminds us all of Breakfast at Tiffany's and polka dots are definitely a subtle retro accent.


If you're more of an adventurous fashionista, you can wear funky cat eye lenses! Why not have a little fun on a sunny day! Whether you're on vacation at the beach or walking to lunch from work, these shades give your life a little spunk and flavor. Try an all white pair or a fun reflective lens. MEOW cat eyes!
February 20th, 2013- How To Brows by M.K. Ngenge (cont'd from main page)
I have what I like to consider a "signature brow." I've perfected it over the years, so that it is a perfect match for me, and I've learned that with minor tweaking, this brow can look great on anyone. Welcome to the art of scuplting your brow!


What you'll need (items are in order with picture):
1. Angle Brush (used to shape brow)
2. MAC Brow wax stick (used to tame brow)
3. Small razor (used to clean up your brow)
4. Tweezers (used to clean up your brow)
5. Concealer (used to highlight your brow, both top and bottom)
6. Lighter Concelear (used to highlight your brow, both top and bottom)
7. Brown Eye Shadow (used to fill in brow)
(Brow tutorial coming soon!)

February 19th, 2013- Microdermabrasion

Want beautiful flawless skin for a bargain price? Microdermabrasion is a hot facial technique that leaves your skin with a glowing feel. You can go to a spa, plastic surgeon or but extremely expensive products to achieve this look. OR, you can read ahead and find a great home remedy for this super treatment!


Microdermabrasion can treat a number of skin blemishes. Wrinkles, scars, pores, acne and age spots can all be minimized and even eliminated by this skin scrub! The way this treatment works is by scrubbing off the dead layers of skin. It rubs off the dead skin with a scrub or tool to expose your fresh new layer of untouched skin.

Technically, microdermabrasion is a light cosmetic procedure that uses a mechanical medium for exfoliation to gently remove the outermost layer of dead skin cells from the epidermis.
Most commonly, microdermabrasion uses two parts: an exfoliating
material like crystals or diamond flakes and a machine based suction to
gently lift up the skin during exfoliation. It is a non-invasive
procedure and may be performed in-office by a trained skin care professional. It may also be performed at home using a variety of products which are
designed to mechanically exfoliate the skin. Many salon machines and
home-use machines use adjustable suction to improve the efficacy of the abrasion tool. These machines are available on Amazon for around $20. What a steal!

For a Do It Yourself solution you can create your very own scrub for super cheap?
Here’s how:
Add together three parts baking soda and one part water. Mix until a paste is created. Apply in a circular motion. Rinse.
Now get that skin clean and fresh!
February 15th, 2013- Matching Mani and Lip Color

What's a hot makeup trend this spring? Matching your nails to your lips! That's right, matching your mani to your lipstick is tres chic and super hot. It shows that your are a power planner ready to master anything that comes your way. With so many colors to choose from, this look can never get tired or stale.

Models and celebrities like Ginnifer Goodwin love this trend. It looks good at the office, on a runway or even a red carpet! You can either find a lip color to match your favorite polish or you can search for a polish to match your regular lip balm! The options are endless.

The most traditional look for this trend is the red color. Red lips and nails show that you are a tigress. It's a very bold look that requires confidence to execute. You can always wear black to tone down the look but either way, you are making a statement about your personality to go red on red. This was most notably made a statement by bombshell Dita Von Teese.


An orange tint is very trendy in makeup right now. You can go full on orange or add in hues of pink and red to make it softer. Orange makes skin look tanner and glowing. This look is super wearable and can translate from day to night easily with a simple lip reapplication.

For those of you with a softer look to your style, the always feminine pink color is a great fit for this trend. A light pink lip and soft pink nail is adorable for spring. It symbolizes the flowers coming to life for spring. You can have a heavier pink and more vibrant manicure for day time occasions or match it with black for an evening out.

Dark lips are the perfect look for a night out with the girls. You can select a soft brown if you have never attempted the dark lip before or you can go all out with a burgundy or dark purple. If you're a beginner with dark hues, avoid black until you feel confident wearing it out.

Now go shopping for twin colors to match your lips and nails this season!
February 14th, 2013- White Nails

White nails are fabulous for this upcoming season. This trend takes you back to the middle school days when you were bored in class and painter your nails with White-Out. Well, it's back and bigger than ever. However, just avoid the pen remover and buy some actual polish for this year.

As with most trends, this one started with celebrity press! Stars like Scarlette Johanson, Eva Longoria, and Gwen Stefani all rocked this trend to the fullest. The white is subtle and looks good with white, vibrant colors and professional suits!

White even looks good on pedicures! You can do a full foot and a full hand to match. This clean white color is best with a funky style. You can wear crazy prints and some white jeans to really compliment your manicure or pedicure. This is the season to start new, fresh, with a clean slate and clean nails.

The white nail look also is stunning with jeans. The white really compliments the denim look. You can wear these nails with cutt offs and a funky top or a long pant and cute work blouse. This spring and summer trend will last a long time and is easy to touch up!

Because of the clean color, the look works best with a busy, fun style. You can stack rings, patterns or bracelets. The minimalist look is best accompanied by a crazy style. Free flowing hair, a fun makeup color palette work well with this all white manicure.

If you want to dress up the white a little while still staying on trend, you can add some detailed flare! A black rim or halo effect is darling on this style. We advise using a plain color or metalic accent. For lent, you can paint a tiny rosary or simply french tip your white manicure! Choose whatever looks best with your personal style.

Last but not least, single nail detail is hot for this trend. You can add one nail with a shimmer and shine or some metal gems. Paint over one nail with a sequin paint or add your own glued rhinestone. Either way, this trend is fresh, fun and on point for spring. Try is out!
February 10th, 2013- Valentine's Day Nails!

It's the month of love. It's the time of year where red comes out of the closet and debuts itself for early spring. For couples and singles alike, Valentine's Day is almost upon us. Whether you have a sweetheart or are doing a dinner with some gal friends, you can participate in the red, hot fun.

Red manicures are gorgeous for this week! You can do a plain manicure like the ones first shown or paint some red hot lips on your nails! This sultry design is fun and festive for the holiday of love. You can create a lip look with two accent nails or paint some lips on every nail! Press on styles are also available at beauty stores this week.

If you have more of a cheeky style, you can paint your nails in a love theme! A love letter is a cute way to design your manicure around the holiday. Seal it with a kiss or heart to really show your meaning. You can also design your nails like the traditional Sweetheart Candy! Different colors and pastels make it adorable for spring! You can pick whatever message you want!

You can try the manicure above by using simple paper hole repair stickers! These are a great tool and available at almost any paper supply store. Using red, pink and pale peaches is adorable for this look. You can stack them, chevron the pattern or even just do simple stripes if the heart shape manicure is tough to achieve.

If you have some extra cash to spend on yourself because you're not buying any Valentine's presents, go to the salon and get a detailed crazy manicure! You can select cute traditionally in love characters like Mini and Mickey Mouse or you can do a montage to the holiday with glitter and love wording. The world is your oyster of pinks and reds!

Last but not least, don't forget about the sign of cupid: the heart! You can do some amazing manicures with heart accents! Do a solo nail or a whole hand of tiny hearts! Use different complimentary love colors or dress up a french manicure for the holiday! If you get stuck, follow the How To manicure below! Happy holidays ladies!

February 9th, 2013- The Perfect Smoky Eye

The smoky eye is a staple sexy look for women all over the world. The blur of darkness brings out the bright color pop of almost any eye and looks sultry for nighttime. However, if you mess up a smoky eye, you can look tired and sloppy for your night out on the town. Luck for you, we have the perfect smoky eye guide right here.


The first step in a smoky eye is to prepare for the makeup. You want to wash off ALL makeup before the start of your process. This way, no makeups will blend and you won't have residual from the night before. You can use a makeup remover and cotton ball or simple water and cue-tips. The next step is to conceal wrinkles. Add an anti-aging cream or your favorite foundation. This will help your makeup stay in place and not run.

Step three involves an under eye makeup. You want to create a barrier for your makeup to stay in place but also add light lines beneath your bags to add some highlights to your look. You'll then want to paint on a neutral lid color as your bottom base for your smoky eye. This will blend nicely with the dark shadows.


The next step is your main and most important stage of the smoky lid. Eye liner is essential in the look. You'll want to apply a heavy line to the top and bottom lid. You can add wing tips if you would like. Since the smoky eye has no harsh lines, you'll want to use a blurring tool to smudge your liner.

You will also need a light colored eye shadow. Either a cream or pink will do. You need to add highlights yo your smoky eye to not appear so severe and look awake and vibrant. Adding highlights below the brow and corner of your eye is pinnacle to the best smoky eye look.

Finally, you'll want to add a dark shadow to the crease of you eye. This can be colored if you desire. You can add blues, blacks or greens to give your eyes a punch and make them pop. Be sure to use the right makeup tools outlined in a post below. Add touch-ups as needed and enjoy your night out on the town!
February 7th, 2013- Trend Cleanses

Ever wonder what the hot trend cleanses are that people are trying? Look no further because we found the 3 most popular cleanses of 2013. Now, we are not necessarily condoning these cleanses. The best body type is one you feel happy and healthy in, regardless of what the scale says. But women are curious: How can I detox? These cleanses are meant to detoxify your body and not solely for the purpose of weight loss. When people over do these meal plans is when they become sick or hurt. So if you choose to practice a cleanse below, practice wisely.

The first cleanse is the GM cleanse. This 7 day cleanse claims you loose 10 pounds in one week! Most women that have tried this cleanse make it to the end and see results, but quickly gain the weight back a week later. However, reports say you feel great afterwards! The first day is all fruits except bananas. The second day is all veggies! day three is day one repeated. Day four is 8 bananas and 8 glasses of milk, dairy and fiber! Day five is tomatoes, chicken and turkey. Day six is all the lean meat and veggies you want. On the last day you eat the beefy onion soup and you'll have achieved your goal!

The two day cleanse is all about lean meats, greens and liquids. You should mix in raw greens, oils, and green tea to accomplish this diet. This diet is a healthy alternative to week long cleanses. You'll feel great and clean out your system if you follow this article to the letter of the law. No cheating ladies!

The master cleanse is the most intense detox diet out there. Complete with books, supplements and a fan-following, the master cleanse is the trendiest diet today. The master cleanse is all about liquids and spices, specifically lemon and pepper. It is also known as the Lemonade Diet or the Liquid Diet. The website is complete with ease in and out eating tips and a regiment to follow.

Many women go on an all juice cleanse that is similar to the master cleanse. Above are some healthy juice mixes to use even if you're not detoxing! Drinking only juices and avoiding hard foods for a week is impossible to many women. But who says you can't enjoy these healthy smoothies.

For all you bold enough to try a cleanse, above is a healthy tip guide to easing back into eating regularly. You don't want all your hard work that week to go to waste! By easing back into solid foods and a normal eating schedule, you can stay detoxed and slim for Valentines day! Good luck cleansing!
February 2nd, 2013- Half Nail Diagonals

Did someone forget to finish their manicure? NO! This is a hot trend for 2013. Half nail diagonal manicures are cute cute cute. You can mix and match almost any color to accomplish this look and the harsh lines are retro and fun for the start of spring.

Nude and pale colors are darling for this look. You can paint your nails with a plain nude color or a soft pink to mimic your natural nail color. Then, once your nails are dry, you can paint a half layer of shimmer or glitter nail polish. Gold, silver or bronze polishes look chic on top of your plain-jane mani.

If you're more of a vibrant nail person, this style works for you too. Hot red, bright blue or pretty pinks can look fabulous in half nail styles. You can even mix and match your neon paints and have a crazy bright hand. Perfect for those drab winter days.


Black or dark polishes give a drastic contrast to your nail. A black top coat is great for an evening out with friends or a date night. Black goes with any color except navy! You can use any polish in your collection. If you don't want 50% black, you can outline your half line with a tiny black separator. If you're feeling experimental, you can make half and half a bit wavy for a cool winter pattern.

To achieve the half nail detail, simply use a note card or a post-it. Start with one nail and go all out if you're feeling daring.
February 1st, 2013- What Your Face Is Telling You

Have you ever heard of face mapping? It's pretty much the key to unlocking the mysteries behind problematic skin. Thanks to the combined knowledge of dermatologists who have analyzed skin behaviors and ancient Chinese medicinal methods, there is a smarter way to interpret and treat skin imperfections. Face mapping is a type of skin analysis that explains why and how certain areas of your face are connected to other parts of your body. It answers questions like: Why do you break out in some areas and not others? The X’s on a map represent blemishes. Different zones correspond to different problems. With this “map” as your guide, you can address the underlying causes of blemishes and correctly determine how to prevent them from recurring. Here is an overview of the basic areas and what breakouts or abnormalities in those areas mean:
Zone 1 & 3: Bladder & Digestive System — Improve your diet and drink more water.Zone 2: Liver — Try cutting back on alcohol, heavy food or dairy. This area can also indicate a food allergy.
Zone 4 & 10: Kidneys — Make sure you’re keeping yourself hydrated with water and cut back on liquids that dehydrate you. This means nix the soda, coffee and/or alcohol.
Zone 5 & 9: Respiratory system — Those who smoke or have allergies tend to have acne here.
Zone 6 & 8: Kidneys — Dark circles are usually a result of dehydration. Drink up!
Zone 7: Heart — Check your blood pressure and make sure you’re not using makeup that irritates your skin.
Zone 12: Stomach — Consider a detox or adding more fiber to your diet to help with digestion.
Zone 11 & 13: Hormones — Stress and hormonal changes can sometimes be alleviated with more water and a few extra servings of dark, leafy greens but if breakouts in this area persistent, make an appointment with your doctor to look into a possible hormonal imbalance. Additionally, breakouts in this area also indicate when you are ovulating (and which side).
Zone 14: Illness — Can be a sign of your body fighting bacteria to avoid illness. Take a breather and drink plenty of fluids. So the next time you breakout or notice dark under eye circles, look to your map (or shall we say face map).
January 31st, 2013- Each Nail Detail Manicures

Manicures have been stepping it up this year for a new and fresh twist. What's this twist you ask? Well, each nail detail manicures! Every nail has it's own unique design to it. At first, it sounds like this may be too cluttered and even a little strange. After careful review we found countless of adorable manicures that had different detailing on each nail and they looked stunning.


The most obvious way to achieve this look is by painting each nail a different color. You can select an array of different colors and even paint the order of the rainbow on your fingers: Red Orange Yellow Green Blue and Violet. Or, you can simply tip your manicures in different colors if you don't want to go crazy. Using the gradient method of one color is also a chic look for the end of winter and start of spring.


Art Deco style works perfectly with this trend. Harsh lines that break your nails into unique shapes are super fun for this look. You can select a few colors and go line crazy much like the nails above. Find funky designs or make up your own for this trend. One nail can easily be all glitter to save time and still look cute.


Fresh designs are also cute on every nail detailing manicures. You can play with stripes, polka dots or even animal prints to achieve the look. Adding just the tiniest sparkle or piece of flare makes a nail stand out from all the rest. Try a checkerboard pattern or a caviar nail if you get stuck thinking of designs.

The last looks above are super detailed and should be done by a professional or a press on manicure. Super fun prints show off your wild side and are perfect for that winter getaway to the beach or a spring break! Find your nail styles and try 'em out!

January 30th, 2013- Blush for Your Face Shape

As exposed here before on Ever So Plush, everyone has little tips and tricks they use to accentuate their facial structure. Some hints mean compensating for the thin part of your face with earrings or glasses and others require hairstyling to add bangs or volume. Whatever your bag of tricks is, be prepared to add one more. Your facial structure can influence the way you are applying blush to your face.

Oval faces are the most common facial shape. You can almost wear any earrings, glasses or hairstyle you desire. As far as blush goes, your usual regiment is probably fine. Simply apply to the apples or highest part of your cheek and swipe upwards to highlight your cheek bones.

You want to make a round face appear slimmer. For this reason, you will want a thin, longer line of blush across your cheek. You want to sweep the rose color alongside your cheekbones and up towards your ear. This will make your face appear slimmer and avoid a rounded cheek on your already rounded features.

Heart shaped faces can often have severe lines and chiseled chins that make a woman look harsh. Women like Reese Witherspoon have been applying makeup to combat this for years. You should apply blush below your apples of your cheeks and sweep upwards. This will stretch the bottom of your face and soften out your jawline.

Square faces too have harsh lines that make a women look harsh and sometimes severe. To combat this, you'll want to apply blush to only the round high point of your cheeks, the apples. This centralized area will soften your features and give you round shapes your face is lacking. Now go try these tips today!
January 25th, 2013- Buzzfeed's Nail Tips!

The Buzz Feed recently came out with a top 27 nail tricks
for the perfect DIY manicure! This list is a life saver for any gal on
the go who does her own nails. Although the blog is known for it’s viral
countdown lists, this time, they hit the beauty mark perfectly. Here are some
of our favorites:
The first 5 tips are:


Use ice water to dry your nails for three minutes after you
air dry for a minute or two.
Fix a broken nail with a teabag and glue! Don’t just rip it
off, repair it!
You can use Acetone free nail polish remover to only use one
cotton ball to erase your manicure.
Purchase a Nutra Nail Gel perfect kit for a longer lasting
nail!
Finally, you can use the netting from a loofa to get a cool
fishnet look.
The next five tips are fun and fearless:


You can make a dotting tool with a nail and a pencil.
You can use PAM to prevent smudges!
For a top coat, apply the paint along the top edge, not the
cuticle side for chip prevention.
To get whiter nails, soak your nails in a bed of hot water,
hydrogen peroxide and baking soda for a minute. Or even whitening toothpaste!
You can also use a tiny brush with polish remover to clean
up your mistakes!
These next TEN tips are super quick but very useful:


Apply polish like a professional in circles.
Dab on glitter; don’t brush.
Apply many thin coats!
Use Aquaphor, not Vaseline.
Use a toothpick to paint a heart!
Use Band Aids for the perfect polish guider.
Apply nail polish thinner when you’re at the end of a bottle
to revive your colors!
Fix a smudge by licking it!
Soak nails in water and white vinegar before painting.
And last but not least, wait extra dry time if the weather
is humid and avoid the fans!
Hope this was helpful ladies, DIY yourself a perfect mani!
January 24th, 2013- Organize Your Makeup Life

Every girl has a makeup stash. Whether you're the type of gal that has a million brushes or only one eye pencil, every gal could benefit from some organization this new year. By eliminating clutter in your life, your bathroom will be cleaner and you will be, overall, a calmer person. If you rush in the morning, having an organizational system for your makeup is the perfect way to cut back on lost time. You can use chic trays like the vanity above or label simple glass holders, fill them with beads and separate your brush tools!


Labels are a simple way to eliminate clutter and bring a systematic regime into your lifestyle. You can use file cabinet bins to separate your makeup into which feature they embellish. You can have a drawer for lips, eyes, skin and cheeks. If your bin is big enough you can place your brushes inside as well! A shoe sleeve for the back f your bathroom door works just as well as the bins. Moms have been using these for decades to organize children toys and hygienic products. You could also shop for some fun fabric bins at Target and sew your labels into the bin. This is chic and stylish for your bathroom organization.


Plastic bins are also a girl's best friend. You can create your very own nail shelf just like in the salon! If you're bogged down by your box of polishes, fan them out in a fun stacked shelf to present yourself with easily accessible colors. At hardware stores and home-goods departments you can also find cheap, clear bins that are perfect for stashing your makeup! You can itemize each powder, lipstick and eye shadow together in different compartments.

The most creative organizational tip we've seen is the creative makeup board. That's right ladies. You can create this adorable magnetic board to showcase your style and all your makeup choices! It makes all your tools easily accessible and you can hang in up in your bathroom!

The board, and possible additional magnetic strip looks amazing in any bathroom. It uses magnetic energy to keep your makeup standing on the wall. All you have to do is find a magnetic back board, glue a fabric or fun paper backing to the board to make it presentable, and then glue strong magnets to the backs of your jewelry. Hang and voila! You have the perfect little organized space.

This item will become a centerpiece in your washroom and can show off your style through the print and colors your select. All your friends will want one just like it. Follow the step by step instructions on this blog to make your very own.


Or last tip for the day is to MINIMIZE! If you don't use some of your old makeup products, throw them out. There is not need for clutter in your life this year! Make sure you know which makeups to pack for big events and which tools are essential to good makeup. Anything else is just a waste of much needed space!
January 23rd, 2013- Face Shapes & Earring Pairs

There's been a lot of talk this week about face shape. What hair style and glasses shape accompany your facial structure are important things to consider in your style choices. Every girl is unique in her own way and has to accentuate her assets. Work with what you have to dress your blessings! Whether you have a circular, square or pointed facial makeup, you can select the right earrings to accompany your looks!

Earrings are the perfect accessory for a glamorous night out or a casual date night in. Dangling chandelier earrings really dress up an ensemble and the perfect studs can make an outfit. The chart above shows you what kind of earrings best suit your face shape! Studs look good for everyone but certain facial types must use caution when wearing super round or very long styles. You want to balance the thickness of your bigger areas and compensate for the thinner parts of your face.

Oval shaped faces look best with long, glamorous dangling earrings. This elongates your face and accompanies your circular features. An oval face is also a great shape for earrings with harsh edges and square detailing. The points add some structure to your soft features.

For a triangle face you want to balance your top heavy shape. Earrings with a lot of girth to them balance the smaller portion of your face to look fuller. You want to avoid earrings that mimic the shape of your face. Try not to draw attention to the wider forehead feature of your face.

For rectangular shaped faces, you want to combat your super rigid structure. Try selecting hoops or circular style studs. Round styles will soften up your look and give you a nice balance to counteract your point feature. Avoid styles longer than your chin to avoid mirroring your long head.

Square headed women look best with dangles or teardrop styles look best in your ears. Celebrities like Kelly Clarkson, Jessica Simpson and Nicole Richie all ear studs or exaggerated shapes to compliment their natural facial structures. Obviously, avoid square styles that look like your face.

The diamond facial structure is a classic beauty shape. These women must go for traditional earring styles that hint at traditional beauty. Small hoops or dangles that are close to the ear look great because they don't overshadow your face shape. You want to avoid long, thin or top heavy styles. When in doubt ladies: stick with studs.
January 22nd, 2013- Necessary Makeup Tools

Every gal has her go to makeup items: concealer, eye liner, blush etc. But does every girl have the right tools to apply them? Most of the time, makeup will not come with the right tools to apply them. Eye shadows come with that sad little brush that is not suitable for use. As my best friend says, "I judge people who use the brush the makeup came with." To avoid this shabby application. You must use the proper tools for your makeup!

The image above is a great starter kit for what tools go with what. For your cheeks, you can use up to seven different brushes to apply bronzer and foundation! Start with a pillowed brush for your cheekbones to avoid caking. Use a small foam brush for apples and a paintbrush like tool for stippling. A firm flat brush is best for contouring lines and shadows and highlight with a tiny fanned brush along your darker areas. The fluffiest brushes are reserved for bronzing and blending. It is best to use one brush per palette or color. When it comes to the eyes, you want small, firm brushes for shadows and lid work and a tiny pointed brush for eyebrows. Always use a comb as well when dealing with stray hairs.


The chart above is your How To Bible for your eye brushes. Use a hard angle to define for your brows and a lash line. Powder shadow brushes are best for eye shadows and blending techniques. You can also use a cream shadow brush to apply soft creams under your eyes and around the edges. For the three looks above follow the brush rules for the Everyday Eye, the Smokey Eye and Essential Eyeliner looks.


For your skin needs, there is also an array of brush tools to use to get flawless looking skin! You'll need a flat soft brush for concealer on those trouble spots. A flat dome brush is perfect for foundation that you apply every day and a soft round brush in various sizes covers everything else. Be sure to sweep from cheek to ears and with the grain of any facial hair. Follow the steps above for foundation and blush tips.

If you're still confused, check out the graphic above for detailed descriptions! The color of the coding for each brush tells you what kind of product you can use it with. You can also check out this blog for helpful tools and hints.
January 21st, 2013- Best Fit Frames

Ever wonder why some people look so good in sunglasses? They know what works for their face shape! Everyone has a differently shaped face: square, round, oblong, oval, heart, etc. If you find a frame that compliments your facial structure or compensates fro a thinner section of your head, you will look chic in your frames! Follow this guide for the perfect fit.
Oval


For a oval shaped face, you should select a large, over-sized frame. You can look great in anything that compliments high cheek bones. Cat eye frames, and butterfly frames also look fabulous for the more flashy glasses wearer. Since your face is thin, you'll want a thicker frame to balance your skinny look.
Square


For square face shapes, you have a pointed edge to your look. Because of this, you'll want to soften up your appearance. Round frames are your look to love. Aviators or oval shaped frames look soft and chic on a square face. Circle frames are super trendy and compliment your look.
Heart


Having a heart shaped face is very unique. This means your forehead is significantly wider than your chin area. This means you'll need a dainty frame as to not overload the top heavy part of you face. Rayban wayfarers are a glass for your face! Oversized plastic frames can also draw attention away from your forehead so you can play with varied sizes to see which suit you best.
Round


For a round face, you'll want to add some pointed flare to your style. Round faces are almost as long as they are wide so you'll want something to break up the continuity in your face. You'll want to make your face appear longer and slimmer. Find square frames or rectangular styles for sunglasses and reading glasses.

Still confused? Check out the chart above for some helpful tips! Not one style belongs to one facial structure so try some lenses on and play around a little with your style. These hints are a good starting place!
January 11th, 2013- Dark Lips

Dark lips are luscious for wintery nights of passion. These goth inspired mouthes are supple and tantalizing for any night out. Many women avoid this trend because they are intimidated by such a dark color and think they may not be able to pull off the look. The dark lips astoundingly look great on most women of varying skin tones!


The first place you will see this trend, like any style that becomes super popular, is on celebrities. Leading ladies love this trend and rock the darker shades with confidence. Jennifer Lopez, Emma Stone and Rihana are all super famous, all have differing styles and skin tones, and all look smashing with a dark purple inspired lip.


Supermodels and high end fashion magazines endorse the trends between their pages and in their main spreads. The "Chic Gothic Chic" look was pioneered by Taylor Momsen and her epic role as spunky designer on Gossip Girl and her gothic inspired everyday looks. Victoria Secret model Miranda Kerr loves the deep purple and so does Vogue. To rock the deep lip, it's advisable to go light on the eye makeup to not overdo your face color.


Think this style is just for celebrities and high fashion? Think again. Average women tried on different lip products of deep shades and LOVED it. Women with different coloring for hair and skin alike all loved the deep shades and said the trend was totally wearable, even in the office!

Purple is definitely the shade to try. With subtle hints of brown, this burgundy shade looks dapper with plenty of ensembles for multiple occasions. Try lip balm and lipstick from Sephora of your favorite brands tonight! You don't have to be a celebrity, but you can sure look like one with your new, dark lips.

January 10th, 2013- The Perfect Foundation

Many women make the huge mistake of wearing foundation that don't match their natural skin tone. Either they find a foundation that is too dark, too light or just all around poor in quality. These can make your face look too tan for your body or make it to appear cakey or overly powdered.

When selecting your foundation, match the makeup to your neck, not your cheek or face. Place different types of foundation on your neck. Select different colors and textures to try to match your skin type exactly. Too light will wash your face out and too dark will make your face look fake tan.
- Step outside into natural but indirect sunlight. If you’re at a department store, ask for a mirror to take outside with you and a couple different shades (grab a yellow-based and a pink-based foundation to see which one disappears more into your skin.
- Lift your chin slightly and apply a finger stroke as shown above.
- Follow with a couple more swatches next to each other to really see which one is right for you.
- Then when you find your perfect shade, please don’t forget to apply it to your neck as well as your face so it all becomes one canvas. And if you’re wearing a low neckline, apply it to your chest too.

Because your neck is shaded from sunlight, it is closest to your natural skin tone. This way, your makeup will be true to your natural color. Once you find a color close to your skin, rub the foundation in with a foam pad or brush. Then, try the foundation on your face as well!

Find a trusted brand of foundation that you like and wear often to try this trick out! If that fails, Bobbi Brown makes a fabulous palette of foundations available to blend and experiment with. Go and pick some up online or in Sephora stores today!
January 9th, 2013- MEOW! Cat Eyes.

Cat eyes are tantalizing for nights out on the town. For those big events you need a show stopping eye makeup to match you ensemble and killer attitude. Cat eyes are fierce and fun. You need to wear them with a confidence to kill and a love of the night. Cat eyes are just a longer tip outside of your eye line that peak at the end. This look is animalistic for your natural instincts.

This look is also called the wing tip look. To "wing" your lid, you can make your outer lashes longer, create a smokey accent at the outer corners of your eyelid or draw out the eyeliner to create a winged lid. Your wings will look angelic for a girls' night out and are fabulous in any dark color.


Celebs and high fashion magazine spreads are debuting the cat eye look! Nicole Richie and Lauren Conrad love the wing tipped look for photo shoots and evenings out. The cat eye looks dashing with a dress or blazer ensemble. It dresses up almost any lok and makes your lashes look bigger and fuller.


The thicker the cat eye the better! You can have the liner at the bottom and top of your lid to create an even more dramatic look. Depending on the shape of your eye and the occasion, double liner may look best for the night. Go bold! You can always wipe off the makeup if you think you over did the look.

Want the look? Follow the How To guide above. First, angle your line up from the natural curve of the bottom of your eye and apply black liner a half inch from your corner. Then, draw a line from the top of your eye to meet the bottom line and fill in the blank for the perfect cat eye.

The same application works for a smokey cat eye! Simply apply shadows and a blunt liner to smudge for a sensual cloudy cat eye look! Use your favorite liner and shadow to achieve a look that's perfect for you.
January 7th, 2013- Throw On Some Red Lipstick & Live A Little!

Red lipstick is chic for 2013. The look is young, hot and retro. The supple quality the color brings to your lips is indomitable by any other lip color. The red is a classic look and has been worn by beauty queens, fashion models, actresses and singers throughout history. Red lips have seen countless events and productions and the look will never die.

Red lips look amazing with almost any hair color or skin tone. They bring out your eyes and are striking with a number of ensembles. The red lips will live on in infamy as immortalized in the 1975 musical, The Rocky Horror Picture Show. The movie opens with a single pair of red lips speaking without a face. Even from before this time, red lips are perfect for a variety of occasions and styles.


Every girl knows it's not a trend unless worn by a bona fide celebrity. The red lip trend has many notches on it's belt in the star department. Celebrities like Penelope Cruz, Rihana and Dianna Agron love their red hot lips. Stars wear this bold color to red carpet events and casual outings as well!

Red lips can be an extremely casual look. They can be worn for day time excursions on the town or even around the office if the attire is right! The best part about this color is that it belongs to no one certain type of style. Feminine chic, rockers and low key gals all look stunning in this lip color.

This color is undoubtedly bold. To wear it you must have effortless confidence and a flawless smile. You should always make sure your lip color stays in line on your lips and never ever strays from onto your teeth. Keep a compact mirror and a touch up product in your bag at all times when rocking the red. It can be very glamorous or rocker trendy if worn with black leather and sequins.

Red lips are also extremely classy. You can wear them for a night out, to a gala event or show stopping party. The red looks best with understood colors like white, black and gold. Your lips will make a huge statement and most likely be the center of attention for your ensemble.

The best products for red hot lips are above! You can do the classic application method as shown with the Tom Ford lipstick. You can never go wrong with a traditional tube. The Lip Scrub is a newer product by Sara Happ and comes in a darling, long-lasting shade. The last product is a spunky package by Kate Spade. Lip crayons and pencils are easy to use and perfect for accuracy! So throw on some red lipstick and live a little!
January 3rd, 2013- Sharpie Nails!

Watch out ladies, there is a revolutionary nail tool on the market today: THE SHARPIE PEN! That's right girls, sharpie markers can be used just like nail polish to create custom creations on your manicure. Ever wonder how women get the smallest details on their fingers by doing it themselves without professional help? The Sharpie provides small markings for the most detailed manicures ever.

You never want to paint your entire nail in Sharpie. The pen is just for the simple accents on your nails! You can place a black heart, star or any symbol on a manicure in a minute with a traditional black marker! If you messed up, don't worry! You can easily wipe the marker of without using nail polish remover. If you want the marker to stay, simply paint over it with a clear top coat!

Although Sharpie markers come in all different colors, the trend for this tool is to use only black, white or shimmer Sharpies. Find a Sharpie gel pen of gold, silver or bronze for your nest winter manicure. The gold can be used for fine lines or polka dots and the black can be used as a herringbone pattern or even chevron! The markers work best on white, black or navy polishes. You also must wait until the paint is dry to mark up your mani.

The two looks above are super popular and extremely easy to accomplish with a fine point Sharpie marker. Simply paint a base coat and use a steady hand. The strips on the left are perfect for simple accents and go with any ensemble. The funky chevron pattern on the right is great for a daytime look at the office.

Check out the looks above for some fresh new looks for the 2013 year! Like we said earlier, don't be afraid to experiment and mess up! The look washes off simply and is easy to redo! Enjoy your Sharpies in a whole new way!
January 1st, 2012- Perfect Eyebrows

Most girls don't spend too much time thinking bout their eyebrows. More attention is paid to makeup, clothing and weight loss when it comes to beauty. However, more detail oriented women find necessary time focusing on brow appearance to their betterment. All different women have different colored and shaped brows that naturally grow in according to genetics and hair patterns. Some women have overly thick brows that need to be tweezed, threaded and tamed. Other women have thin, wispy brows that need to be filled in and even dyed. By finding the best brow to match your faceshape and your natural eye curve, you can wow a crowd with very little effort.

First and foremost you must focus on you arch. The arch of a brow must mimic the curve of the eye and has 3 major points to follow: start, high point, end. You should use a ruler or straight edge to line up all 3 points of the arch before trimming in any way. Your brow should start at the corner of your eye or nose. Some women must pluck the space between their eyes but be careful not to overdo it and remove hair too far past this line. Then again, make a straight line angled half way between your eye and the two points of start and end. You want the arch to be high in the middle of your cornea. Finally, the downward arch must be soft and equidistant to the apex of the brow. Make sure the line isn't too harsh and always pluck one hair at a time as to not over do it!

In order to create the perfect brow above, a lady must know her tweezing secrets. First, buy a good pair of flat edged tweezers. They are more expensive but do a better job at removing hair. Then, you should wash your face with hot water to open up pores and make hair more susceptible to removal. Make sure you are in a well lit area and even possibly invest in a lit and close-up mirror. Clean your brow and create a perfect brow shape stencil for what you want your brow to look like. Place the stencil over your eye and tweeze the area not in the shape. Make sure to tweeze in the direction of hair growth to get the root of the hair gone. Repeat for both brows!

Last but not least, be sure your brows are dark enough and match the color of your hair on your head! There is nothing worse than mismatched colored brows! If you dye your hair blonde, you must tone down the color of your brows to make your hair look natural. If you want to darken your brows, this tip works for you as well! The Beauty Department suggests using a spoolie of old, cleaned mascara brush to paint in your brows with dye! Make sure your brows are clean first and apply color from the inside out. Be sure to clean the messy edges with dye remover or a thorough washcloth. Leave dye on for 5-10 minutes and then remove with a Q-tip. If they aren't finished, reapply the dye and wait longer. Finally, clean with a warm towel and spot treat any areas you may have missed! This new year, make sure your brows are flawless.
December 29th, 2012- Teeth Whitening Tricks

There is undoubtedly no better accessory than a healthy bright smile. The trick to this is a white, straight set of teeth! You can lather on makeup and lipstick but without a clean smile you are missing the mark. A bright smile can draw a crowd in and a poor smile can draw negative attention to your mouth. White teeth can make or break you. Here are some helpful tips to a New Years perfect smile!

This home remedy has been ascribed to those with off-white teeth. First, you put a tiny bit of toothpaste into a small cup, then mix in one teaspoon baking soda plus one teaspoon of hydrogen peroxide, and half a teaspoon water. Once the mixture is made, thoroughly mix then brush your teeth for two minutes. Repeat this ritual once a week until you have reached the results you want. Once your teeth are good and white, limit yourself to using the whitening treatment once every month or two!

The second remedy is highly recommended by Dr. Oz! The ingredients are 1/4 cup of baking soda + lemon juice from half of a lemon. You then apply with cotton ball or q-tip. Leave the mixture on for no longer than 1 minute, then brush teeth to remove. Repeat as needed! The popular television doctor swears by this method!

The final home remedy for a bright smile is Crest Whitestrips! This product will run you aorund about $40 but is totally worth the price! You apply these strips to your teeth for 15-30 minutes at a time. Brush your teeth to remove the formula and repeat for weeks until you achieve the desired result. Although this is pricier than the options above, it beats professional dentist whitening by hundreds of dollars! Just remember: a bright smile is the best accessory to have this season.
December 28th, 2012- 5 Quick Tips Beauty Tips

Hello beauticians and fashionistas! Today we have 5 quick beauty tips that will help you look fabulous for the year 2013! These beauty hints will help you look more rested and glamorous. You will be on your way to looking like the best possible you for the new year! Read on and apply as needed!

Not every girl looks her best right when she wakes up. To attain a youthful, bright eyed look early in the morning, apply cream to the outer parts of your eyes. This will reduce bags because the cream drifts as you sleep. If you apply it half an inch away from your desired area, you'll wake up with the targeted wrinkles and puff moisturized and rejuvenated.
When applying eyeliner, make sure you have a tight line. The gap in your liner can make your makeup appear messy and unclean. If you tighten your line you will appear more put together and professional in your look.

All girls have run into clumpy lashes before. An old mascara or poor lash care can often mess up a look for an evening out. If you don't use the original mascara brush, you can get a fuller, cleaner look from your makeup and lashes. Paint your original mascara onto a separating brush and apply as needed that way. Therefore, when you use a curler your lashes won't clump together and crowd. You can attain a full, healthy looking lash.

Here is a quick foundation and powder tip: apply your brushstrokes in a downward angle. This way, you won't be painting against the grain. Often times, powders can accentuate unwanted hairs or blemishes if applied incorrectly. No need to draw attention to hair by making it stand on edge with high quality makeup!

Last but not least, finding a way to deal with unsightly blemishes has been a longstanding mystery to some. Other than attempting medicines and health kits like Proactive, here is a home remedy to try in your spare time. Use a hot washcloth to reduce blemishes. Never scratch or squeeze a blemish or mark because you will only make it worse ladies! Try these tricks at home for a healthy looking you!
December 27th, 2012- Victoria Secrets Best Kept Secrets

Recently, we stubbled upon this amazing blog called Maskcara.com. This blogger revolutionized the way girls look at Victoria Secret! The companies best kept secrets have been unlocked! Hair, makeup and skin tricks can turn any girl into a VS model!

The first trick is to add volume to your hairstyle. All Angels have extra volume in their hair when posing for magazine, commercials and when walking down the runway. You can to do this when the hair is wet. Blow dry with curlers and a blow dryer. The next big tip is to add in extensions. There's no shame in borrowing a little extra wave and volume!

The next big makeup tip is to highlight curves by adding in shimmer in the right spots. It makes you look awake and youthful while accentuating your pout. Use light bronzes and high quality shimmers from Sephora! Add in some fake lashes to really make your eyes pop!

Victoria Secret's biggest secret it the body makeup! The girls use lotions and self-tanners to give their skin a glow all year round! Airbrush legs and heels make all legs look runway ready and is a super handy trick for New Years legs!

The final tips include accentuating your natural beauty. The bang swoop gives and appearance of stealthy sexy appeal. The bangs are a peek-a-boo fashion that leaves men wanting more. The final word on makeup is all about bringing out your own natural features. Plump lips, big winged eyes and defined cheekbones are always desirable things to highlight. Find the best makeup for your coloring and structure to make you more gorgeous than ever! Visit her blog for more Angel tips and trends!
December 26, 2012- Plaid Nails

Plaid nails are a fabulous way to kickstart your new year and remain festive all at once! Plaid is a traditionally winter print as it often finds it's way onto coats, scarves and other outerwear. Traditional Burberry plaid is most popular and associated with high fashion or wealth. The brown, black, white and red colors match almost any ensemble and are perfectly understated for a full manicure. There are plenty of colors to use to have more fun with plaid!

Red is by far the most wintery and festive color plaid. The red reminds people of Christmas wrapping paper and holiday table cloths. You can also find a traditional Scottish or Irish print to appease your heritage or favorite area! The pink is a fun and modern twist on a very old look.

Gray plaid is stunning for everyday wear. The subdued color matches almost any ensemble. You can use gray as a background for your stripes or vice versa. Gray looks best with black, white or red. However, the accent nail in the top left of the image above is just darling for the season. Gray is a great compliment to almost any accent plaid.


More fun colors are also available for experimentation for the more creative nail lovers. Blues and turquoise fashions are super trendy and look adorable for day time nails! Paint an accent nail or a complete set with different color plaids! Purple is also a fun color spectrum to experiment with. Be sure to arm yourself with plenty of white and black polishes for stripes!

The How To graphic above shoes you how to get the look with perfect lines! Paint tape strips for your nails beforehand and secure them to your nail for plaid perfection! If you have the time, you can follow the instructional below for an acrylic set how to. Happy painting!

December 22nd, 2012- Fake Lashes, Real Stunning

Fake lashes are the best accessory for a girls' night out. They make you look more feminine, flirty and seductive. These fake lashes draw attention to your eyes and really make your makeup stand out! Good mascara can only go so far for this look. No mascara holds a candle to a good pair of fake lashes.

Fake lashes are easy to apply! First, roll your natural eyelashes with an eyelash curler. Second, pick a lash that matches your natural eye shape. Next, cut the lash to fit your eye length. After that, apply the glue to the lash, clean your eye and stick them on! Add eye liner to really bring out the look!

Check out the difference fake lashes make to the looks above. The shadows and liners look darling for any party. But the lashes make the look. The thicker and blacker the lash, the better! You can select all colors and shapes of lashes to complete your makeup look.

The 8 styles of looks above are the most popular lash look. The sexier styles include the big spender lash, the prima donna lash, and the rockette look. However, fake lashes are not only for sultry evenings. Subtle dainty spread lashes give a girl next door effect that look great with any outfit for everyday occasions.

There are three main ways to apply lashes: individuals, half set and full set. Individual lashes are easy and provide a simple look. You cut a normal pair of lashes to fill in the holes where your normal lashes are thin. The half set is usually applied only to the corners of your eyes and the full lash is more for a night time look.

If you want full Barbie lashes like Nicki Minaj, follow this secret tip above! Cut the lashes in half and only apply the the corners of you eye! You can even put mascara on the fake lashes to make them darker and longer. This provides a sexy cat eye that is flirtations and sweet! Check out the best products and various kinds of lashes below! The colors are great for a costume party or a crazy night out. Shop at Sally Beauty Supply or CVS for the looks below!


December 20th, 2012- Christmas Nails!

With only 5 days until Christmas, you have just enough time to paint a festive manicure to last until the holiday! You can have snow nails as detailed in the post below, or mix it up with some holiday inspired manicures! Red, green, blue and any kind of shimmer polish is hot for this trend. Whether you're painting characters or candy, you're sure to love this trend.

You can have generic Christmas inspired nails by using the specific color palate shown above. Reds and greens look dashing when accompanied by some white, gold or silver for the holidays. You can paint some festive leaves, a winter pattern or simply just use these colors in lines or polka dots to create some holiday fun!

The Christmas Tree manicure is a super fun and festive way to show your Christmas spirit. All you need is a green polish background and some skinny tape or scissors to create skinny lined tape. After your bottom coat is dry, create a pointed tree shape and paint gold on top of the boarders. place a shining star or bead on the pinnacle and you're finished!

If you don't want the whole tree, you can create a mistletoe or holly inspired nail! The looks above are easy to paint and holiday chic. The french manicure adds some flare with arranged bling but you can paint the color scheme and pattern yourself if you don't like the jewels! Holly is easy to map. One green leaf and three red dots and everyone knows those are holly berries!

If you have extra time on your steady hands, you can attempt to paint this extreme lights manicure! You can do it atop a french manicure or a simple white bak grouch! You can paint or glue a black string to your nails and cover with a clear coat. Next, add tiny light dots with a small, pointed brush. You can have multicolored or singular colored lights! It all depends on your style.


If you want to spread the maximum amount of Christmas cheer then the looks above are for you! Rudolph, Frosty and Santa are all coming out to play on your nails for this season! You can create a look by painting the tips of your nails. If you can't decide, do all of them! There is no such thing as too much Christmas spirit! Copy the looks below to attain holiday perfection.


December 12, 2012- Let It Snow!

Has the winter weather got you down? Why not make a fun fashion statement with it! Snowflake nails are cute and festive for the holidays! Whatever your religion happens to be, you can show your December spirit by painting frozen rain on your nails!


Blue is a fabulous winter shade for a manicure. Why not liven it up with pretty shit snowflakes!? You can paint a plain blue base or have a sequin blue as your bottom coat! Buy press on stickers or paint the flakes by hand! Every manicure can be unique just like the snow! Getting engaged this holiday? Make sure your winter manicure is perfect for all the pictures of your bling.


Instead of painting a silent night, dark blue landscape, you can brighten up your manicure with some baby blue! This frosty look will get you compliments galore. Paint over your base with some clear glitter polish or get creative with only tipped colors! Play around with your nails to achieve the perfect winter look.

For those of you who are obsessed with Christmas, the nails above are for you! Red reminds you of those tacky Christmas sweater prints we love so much! Its also perfect for wrapping paper matching and is just more festive. dint be afraid to add some dots in with your flake designs!


If you're more of a plain-Jane type manicurist, try the looks above! Grey, black and white are darling for almost any outfit! These subtle, dull colors don't draw too much attention to the hands but are unique and adorable for winter. Check out the tutorials below to get your perfect snowflake look!


December 10th, 2012- Glitter Gradient Nails

Glitter gradient nails are a perfect manicure for the season. These sequin tipped nails go great with any party attire or ensemble. You can select different polishes and glitter paint to customize your own, unique look! Match your top, dress or even eye color to play with your nails in a creative way.

The gradient look is achieved by gradually adding in glitter to the tips of your nails. Length doesn't matter for this look! You can wear short or long nails for the trend. This is a fun twist on a French Manicure. Paint the base coat first, let it dry, then apply glitter and a top coat and you're ready for the gradual shimmer look!


Nude colors and naturally toned bases are popular for this manicure. It is more versatile and day-wearable if your colors are toned down. The hint of shine is office appropriate but looks dashing out at bars and parties. Subtle grays and peach paints look best for this style.

If your'e feeling more courageous or have a fun, festive event to go to, find a bold color and go gradient wild! Pinks, greens and blues are a fun way to dress up your hands! You can find glitter of a complimentary color or the same general tone as your base. Gold and silver shine always look great with any color. You can also find a holiday red or green to jazz up your holiday spirit!

Here's a "How To" guide to create your own gradient look! Happy painting!
December 6th, 2012- Morning Tricks of the Trade

Sometimes it is unavoidable looking disheveled in the morning time. When you've had your best nights' rest, you often look your worst: hair in tangles, dark circles, blemished skin. But we have some tricks of the trade to have you looking your best by sunrise! These tips help improve your skin, reduce wrinkles, repair your hair and brighten your smile!
Skin: Wear a decollete pad to bed! They smooth imperfections and minimize wrinkles. You can also try Frownies for crows-feet and mouth wrinkles. Buy yourself some gel-lined socks, namely Bliss Softening Socks. They soothe and hydrate your tired feet overnight. For a cheaper version use old wool socks and vaseline. You can also apply cellulite cream to those looser areas and even add a bit of self-tanner in to get the perfect glow!
Teeth: Whiten your teeth while you sleep! This will give you a beaming smile and make you look radiant. Try Nite White Excel for the perfect smile.
Hair: Sleep on a satin pillowcase to avoid friction and hair frizz. Leave in this Protein Repair Mask to the tips of your hair! Rinse your hair in the morning and you'll have beautiful rejuvenated ends by morning. An amazing night time trick for fabulous curls is using a half water half leave in conditioner in an overnight mask under a night cap. Go to The Beauty Department for more tips on hair care!

Look your best tomorrow morning with these easy tips!
December 3rd, 2012- Sequin, Glitter and Sparkling Nails

Sequins are all the rage in fashion this season! Whether they are on your clothing, shoes or accessories, the glitter goes perfectly with any winter ensemble! The shimmer makes you stand out in a crowd. The same can be said for nails as well! You can join in the sequin trend by updating your manicure or pedicure for the perfect holiday look.

Most traditionally, sequins look best in gold and silver. Read below for more metal manicure inspirations! This trend, however, is not just for glitter polish. You can buy loose sequins and paint secure them onto your manicure with nail glue and a clear top coat! This look is best with a party dress or jeans and an embellished top.


Sequin polish makes for great accents! You can paint one nail as an accent nail to add some sparkle to your every day manicure. Your average color will look glamorous by painting a silver, gold or even a similar color glitter on only one finger. The ring finger is most popular for this trend. Didn't get proposed to this season? No problem! Add the bling on yourself with this nail trend. Other sequin accents like a french tip, side angle or funky pattern adds some flare to this trend as well.


The next most popular colors for this trend are deep twilight and electric blue! The blue is more daring and needs to be worn with a complimentary outfit. Either go all out in true Katy Perry style or wear a subdued black frock to make your manicure stand out! The black and rainbow twilight color is popular for holiday ensembles and the upcoming New Year!

If you want to join in the trend but have to keep your hands neutral for office attire, don't worry! You can treat yourself to a sequin pedicure as your holiday delight! The style looks fabulous with peek-a-boo style shoes and heels! Make sure your nails make a statement this season!
November 13th, 2012- Caviar Nails

Caviar is not just a delicacy you find in nice restaurants and on sushi! We're not talking about edible eggs here! Caviar nails and polish are big this season and super fun to show off! The little beads look a lot like sprinkles you would put on an ice cream cone. The texture adds a spunky look to your manicure.

The polish costs around $25 and is available at Sephora! Ciate is the most popular brand of caviar polish available today. Normally, this look had to be achieved with paint and clear polish over loose beads, but now, a polish bottle is available. It comes in an array of colors for your pleasure!


Spunky colors are a great way to spice up your Fall ensembles. Usually, Fall colors are dark and gloomy, but with fruit inspired caviar there's no need to look glum! Accent nails are best suited for the caviar look! You can have one nail done and the rest of your hand a cute purple, green of red!


Teal and mint colors have been super trendy recently. The teal trend is here to stay in caviar nails. You can mix and match your blue hues or you can find a copper or shine caviar polish to mix in with the light blues. This mimics a rusted, vintage copper. You can paint all 10 digits with caviar or just two! Mixing and matching dark and light colors is always a great way to explore your options and match your outfits.


Dark colors are more traditional with Fall. Dark blues and browns are great for a Thanksgiving weekend or a casual day in sweaters and jeans. The neutral tones match almost any colored outfit. The caviar look is fabulous to dress up for parties and nights out. You can find a black color to have a sultry manicure and even accent it with a hot red! How seductive!


Rainbow caviar is super girly and fun! This cutesy style is great for baby showers, wedding parties and even an ice cream outing. The caviar resembles the sprinkle toppings that may come on an ice cream cone! Do accent nails or the whole hand!


For those of you who want to get the high class look at home, follow the How To directions above and browse the assortment of colors! Enjoy your caviar in more ways than one!
November 12th, 2012- Metallic Nails

Metallic nails are perfect for the upcoming months! This
style mimics regular coins you see in every day life. Pennies, quarters and a
golden dollar are the inspiration for this look! Gold, silver and copper nails
are cute for Fall and transition from day-to-night.

Gold nails are earthy and glamorous all at once. This look
is extremely retro and reminiscent of the 70’s era as portrayed in countless
movies. The gold matches mostly all outfits so this manicure is for the girl on
the go who doesn’t have time to change her nails.

Gold can be pure and shiny or riddled with shimmery gold
glitter! You can add an accent nail or detail by just picking a different hue
of gold or buying a sequined polish. OPI makes a fabulous polish for this look
and it’s great for parties!


Silver is also a popular look for Fall. It gives your nails
a little shine for those who may not wear a lot of jewelry or if your gems are
covered by jackets and sweaters. When wearing silver polish, you should try to
match your jewelry as well! Be sure to wear silver necklaces, rings and
earrings to match this look.


Copper and bronze are the most unique paints for this trend.
They look stunning with any metal you may be wearing and look a lot like rose
gold. This earthier tone makes your skin look tanner and gives a subtle hint of
shine to your look.

You can find polishes at almost any CVS or beauty store to
accomplish this trend and you can play with the detailing to incorporate the
metallic paint into an array of manicure styles and designs! Try the look below
to achieve a tarnished metal look that is natural looking and fun!

November 8th, 2012- Reverse Nail Detailing

Tip of the nail detailing has been as common and as popular as the French manicure. This season, there's a subtle twist to the traditional style. Bottom nail detailing is fun, creative and flirty for Fall and Winter occasions. The subtle fade out is popular for Fall and so is the fade in! Details at the bottom can be flowers, glitter or even a darker tint of you polish!

White and gold or white and glitter shimmer is super cute for the holiday season! The light nails match pretty much everything and can go from day to party-ready in a hot second! The white is darling for a Christmas or New Years party. The subtle detailing is a great twist to a normal manicure and give a much needed flare to an ordinary hand.

Darker fade ins are great for evening attire. Brown or black base colors are fabulous with deep reds or burgundy outfits. If you have a formal occasion this manicure is just the right amount of fun but formal enough to carry a dress. Glitter nail polish is fabulous for this fade and looks best with the same color highlights as the bottom color.


Blues and reds are great base colors for the trend if you're searching for a pop of color in these dark, cold months. These colors look amazing with black and white dresses. If you go bold this holiday season, red dresses with red nails look darling for evening events or happy hours. You can do heavy glitter or subtle low-lights on top of the nail closer to the nail bed. Blues look great with light blue details or white glitter!

Follow the DIY home manicure with two polishes and paper hole repair stickers! Get the amazing reverse nail detail look in 6 easy steps!
November 5th, 2012- Gingham Nails

Gingham is hot for Fall fashion. Manicures are taking a hint from home design and trendy dress styles. Gingham, or checkered pattern, is adorable for nails this season. This pattern can be dolled up to be super glam and cutesy, or dulled down to be day time wearable. The stripes can be a variety of different colors depending on preference, ensemble or detailing.

Eggshell blue is one of the most popular gingham colors for clothing and nails. This look is heavily inspired by the movie The Wizard of Oz as Dorothy wears a blue gingham jumper throughout the movie. This color is a staple of southern belle style. You can wear your nails short or long for this fashion and mix up the polish hues. You can go darker than Dorothy with a navy or ocean blue. The background color can be kept white or turned yellow as shown above.

The second most popular gingham trend is accomplished with red polish! You can mimic a picnic blanket with your red checkered nails! This style is extremely retro and is often glommed up to be a pin up inspired style. Pin up girls in the 40's and 50's loved gingham with playful fruit designs like a cherry or strawberry. The look can be either very girly or super pinky depending on the rest of your ensemble. Check out this How To video for a strawberry gingham manicure!

Not every girl likes to stick to tradition. You can play with your color scheme in your gingham style. Orange and green are adorable colors to try for this pattern. Funky colors give the colder months a surprising kick of much needed brightness. You can match your gingham to a skirt, shirt or pants for a fun look! If you're feeling more playful, you can try a different color on each nail. Whatever your style, make sure you have a lot of white polish and a steady hand.

Gingham is also divine with super glam and feminine nail design. Gingham can be amazing as an accent nail on a very lavish manicure. You can add sequins, rhinestones and glitter to spice up traditional gingham in a very girly way. Gingham hearts are also a fun and flirty way to show off your femininity. Try the colors above or mix it up with a Fall inspired palette.

Want to try to get the look yourself without going to a nail salon? The Beauty Department blog has just the answer. Try their step by step instructions to achieve a gingham accent nail that is darling for Fall. Happy painting ladies.
October 31st, 2012- One Last Pink Inspired Hurrah: Awareness Manicures

Breast Cancer Awareness month is almost over, but you don't have to stop showing your support just because the month has ended! A pink manicure is a perfect subtle way to fight for the cure! You can follow any of the nail trends written about below for a super current look. You can swirl or ombre your manicure in different shades of pink. Single nail detail is also a hot trend for this season, so why not make your ring finger pink ribbon fabulous?

Ultra feminine and glam nails are Fall fabulous. You can add a little twinkle to your pink polish by painting a glitter finish over your top coat. You will look stunning at any holiday party with a little added sparkle. If you have a very girly style, you can add fun nail detail to your manicure. You can glue a bow, ribbon or rhinestone onto your nail for a jeweled look without the jewelry!

You can always war your support in a more vivid and obvious fashion as well. The pink tipped manicure is a darling way to raise awareness. You can add a subtle black line, sparkle polish and pink ribbon detailing to make your manicure really stand out. The other hilarious manicure above has sent a message loud and clear. You can even dare to paint breasts on your manicure! Make sure to pair it off with the signature pink or a "save the tatas" slogan to make it obvious what you're supporting!

Pink ribbons are the ultimate look for pink nail art. You can paint them yourself with a steady hand and a smaller brush. They look darling on a lighter pink background or plain white nail. For those less artistic, you can search for press on designs of the pink ribbons repeating as shown above!
Your feet can participate in raising awareness in the fight against breast cancer too! Single nail detail is adorable even on feet! You can give yourself an all pink pedicure with pretty glitter detailing. You can choose from an array of neon or pale pink colors for the base coat from any beauty store. To mix it up, purchase small sequins to arrange in an awareness ribbon. The pedicure will look stunning for weeks and will serve as a reminder that breast cancer awareness shouldn't only be a single a month occurrence.
October 30, 2012- Halloween Nails

Happy Halloween gals and ghouls! If you’re feeling festive
we have just the beauty tip to get you into the holiday spirit: Halloween
themed nails! That’s right, you can be spooky, cheeky or color inspired. You
can create scary monsters or traditional icons of All Hallows Eve. Bats,
Witches and Candy.. Oh my!

You can have one theme or a number of iconic symbols. Black
cats are easy to paint but applying black on a simple background as a circle
with two triangles. You then create green or yellow eyes to achieve a spooky
masterpiece. Try creating a white spider
web on a black background with a thin brush. Pumpkins are also easy witth three
easy colors: black orange and green. Try a Frankenstein with green and white polishes!

Candy inspired nails are ultra sweet! You will probably receive bag loads of candy tonight but the most traditional Halloween candy is candy corn. You can
easily create this look yourself with white, yellow and orange polishes and
wear it long after one day. Start by painting your full nail and orange base.
Wait until the first coat has dried then place pain at the center of the nail.
Paint white and yellow on the two opposing sides of tape. Once it dries, remove
the tape and enjoy!

If you’re trying to sport a scarier look, blood shot eye
balls are all the rage for trick-or-treating. Start with an eerie black polish
for a background. Once you have waited for the bottom coat to dry, place white
circles on your nails. Then give each white dot a green or blue small dot and
black pupil. Top it off with red squiggle lines for veins and you have yourself
a creepy Halloween manicure!

Last but not least, a black and white manicure is definitely appropriate for this Day of the Dead. You can create eerie skeletons with a steady hand or make a "Boo!" inspired manicure with polka dots, webs, bats and spiders! If all else fails you can always match your manicure to your costume colors! Get creative and enjoy the holiday!
October 29th, 2012- Halloween Makeup

Halloween is a mere 2 days away! Wednesday is approaching fast and we're here to give you tips on how to be scary and fabulous. Halloween makeup is here and in full form. You can be a princess, clown or zombie if the makeup fits! The right shadow and face paint can transform you into any thing you want to be. Here are some styles and tips to get you started:


You can add subtle eye detail for a frightful delight. Eyes can be costume themed or just spooky in general. You can do traditional creepy details like spiders, webs, and bats or you can exaggerate your lashes to match your dress up ensemble. Your eye makeup can be a costume all in itself! Add wonder woman or superhero eyelids or a fast-food inspired look to be cheeky and fun!

If you don't want to clutter your eyes, your lips can be your canvas. Draw exaggerated lips and teeth or go with a darker shade to match your character. Read this blog for more options on how to get great Halloween looks.


You can do your makeup to look like you stepped right out of a painting or comic! The dots and exaggerated eyes are pop art perfection. Find a black eye liner or pen to draw the exaggerated lines and dot your face with red or blue paint as the backdrop. Bright lips and tears give the perfect accent to your face. Follow this tutorial for the pop art look.

If you want to be sufficiently creepy, try out this zombie or half dead look. You can do your normal makeup on half and then have the eroded skin look on the other with skeleton makeup or zombie blood! This "How To" video is the greatest way to make your zombie self come alive! Make sure to buy lots of paint and red dye.


If you want to be the undead, makeup can help you terrify other trick-or-treaters! To be a skeleton, you can paint your full body or half body. Make sure you have plenty of white and black paint to cover your face, chest and arms! Make sure to wear plenty of black to accompany your makeup. If you want to look more realistically dead, more blood and fake bruises can create a zombie look! You can turn any costume into an "un-dead" version of your character. Fake stitches are also a creative detail for zombie looks.

If you don't want to be terrifying, you can go for a more playful route! Cheetah or lion makeup is darling for a PG rated Halloweens. The adorable momma cheetah and baby cub costume is made adorably cute with spot makeup! You can do your whole face or just the corners. Friendly makeup is great for couples costumes. Try the look above or get creative like the fish tank detail below! Happy Halloween!

October 25th, 2012- Herringbone Nails

Herringbone is not just for wool coats! The fishbone inspired pattern is creeping its way onto home goods, accessories and manicures! You can get the adorable herringbone style for your nails with an attention to detail, a steady hand and different polishes. The key is the zig-zag pattern that weaves in and out. The look resembles a fishbone or multiple arrows!

Herringbone nails look a lot like cross stitch. You want to make sure you give the folding appearance in your manicure, much like a basket weaving. You can select a variety of different colors and thicknesses for your pattern! As you well know, single digit detailing is super trendy right now. Why not make your ring finger stand out with a herringbone pattern. You can mix it up with glitter as featured in the first photo. Having the lines be neat and clean is the number one rule for this style. Blending together is not a good look for this fashion. Make sure each layer of paint is dried before applying another stitch.

You can even copy the original color scheme of traditional herringbone! Grey or black with a white background is the perfect Fall palette. You can match your shoes, coat or vests for herring perfection. For these colors, a smaller line is most fetching. this way, you can easily see the white backdrop without over shadowing with your top coat. The original herringbone look is covered in small detailing and you can paint the nails to match!

You can DIY this manicure to perfection by using nail strips! Simply paint each strip a different color, crop each to a straight small line, and weave in and out! Paint clear polish as a top coat to make sure you're nail detail remains intact! Enjoy your new marine skeleton inspired look!
October 23rd, 2012- Show Your Cure Support with Pink Makeup!


What is the most unique way to show your feminine solidarity in support of your sisters fighting breast cancer? Pink makeup of course! Pink eyes, lips and cheeks are a great way to inspire a cure in the fashion world. Makeup artists and average women alike have been playing with the pink palette for decades. There is no better time to try out your pink beauty tools. Pink lip sticks and balms are simple add a simple feminine pop as pink blushes give a sun kissed appearance and liveliness to your face. Here are some ways to try the trend:
Eyes

Pink eye shadow and eye liner are important tools in achieving pink perfection. Pink is a fabulous color because it compliments almost any color eye! It provides an amazing contrast to green, blue and brown eyes. You can wear pink shadow that has a shimmer or gloss for more formal occasions or a night on the town. More matte pink shadows are great for daytime. If you're realign feeling an obvious supportive trend, create a pink ribbon effect around your eyes!

You can also create a smokey eye effect by using pink and purple shadows! You always want to move from lightest shade first to darker shade towards your outer lid. Apply a pink or white base to your lid and sweep a deep pink or purple to give your eyes a fuller appearance. The smokey eye is great for spicy evening looks.


If you have a bold style, you need the makeup to match. Hot pink eyes are a great way to rock this trend. Buy a variety of hot pink shadows, made by companies such as Mac, to get this look. Don't be afraid to over apply and experiment. Just be sure to wash it off at the end of your night to avoid pink pillows and clothing!
Lips

Celebrities love this pink makeup trend. Pink lips can show your support for Breast Cancer awareness and make you look fabulous in the process. Stars like Blake Lively, Kirsten Dunst and Rachel Mcadams live for his trendy shade of pink. You can mix and match: glossy and bold, matte and subtle or vice versa. Your lips are your canvas.


Most recently, Katy Perry, Rihanna, and Emma Stone have been spotted with a hot pink pout for interviews and awards ceremonies. Their bold styles help them carry the hue effortlessly. These Covergirls are super bold with their lipstick and dress and it pays off! Hot pink definitely takes some courage and confidence to pull of but the reward is endless compliments.
Cheeks/Foundation

Lighter lips are also feasible with pink cheeks and foundation. You want to match your pink brightness to your outfit, complimenting makeup and skin tone. Your pink lipstick or gloss with make your lips stand out but also provide a great highlight to your cheek bones. Apply pinks to the fullest part of your cheeks to give yourself a rosy, healthy looking complexion.
DIY & Advice

You want to make sure you're not purchasing cheap products. Although some makeup can ring up a large bill, the negative effects of poor makeup are far worse than the alternative. Cheap blushes, shadows and glosses can cause your skin to break out or rash, will last a for a shorter wear and can look tacky or need extra application. Quality makeup produced by higher end companies Like Mac or Chanel is well worth the extra cash and will last infinitely longer. You will get more bang for your buck especially if your wear makeup regularly.

Try this flawless Fall look needing only 3 shadows, mascara and some eye liner to achieve pink perfection. Fight for the cure, wear pink makeup!
October 22nd, 2012- Single Nail Detail

Single nail detail is an adorable manicure trend this season. Getting the look is simple: paint 8 nails one color and the remaining 2 a pattern or different paint. The ring finger is the usual digit to differentiate. Select your favorite base nail color and find a complimentary color or pattern for the two different nails.


Aqua and feel are popular colors for this trend. You can paint your nails a fun blue shade to accompany your detailing. Shimmer or glitter polish is a great single nail polish because it can match your base color and provide a little bit of flare. Fun patterns are great to spice up your regular manicure. You can select floral patterns or animal prints for your single nail detail. Adding extra color also makes your hands pop. Choose rainbow blocking or a mixed swirl to liven up your hands.

Pink is a super feminine color for this trend. The sequin or gem detail is a perfect accompaniment for the chic girly color. The extra detailing makes your hand look feminine yet bold and flirty. Add extra webbing or a contrasting deep color to accentuate your manicure.

In direct contrast to the playful pink, black also works for this trend. Jet black can provide harsh, spunky lines when painted over in triangles. The beauty of black polish is it goes with everything. You can choose any second polish you want! Glittering black is a softer way to wear black and it resembles stars in the sky. Round out your celestial inspired hand with a rainbow or galaxy inspired single nail palette.

Pale neutral polishes set a great backdrop for an interesting single nail detail. You can paint a tribal inspired mural or even a flag! The more colors the better when you go neutral! Pour all your creative energy into two nails this season.
October 19th, 2012- Art Deco Inspired Nails

Art Deco was an eclectic artistic design style that began in Paris in 1920 and lasted well into the World War II era. The style influenced all areas of deign including architecture, interior design, fashion and jewelry as well as the visual arts such as painting, photography and film. Although the style declined post-WWII, it gained popularity again in the sixties and has been revived in recent decades since. The style is inspired by straight harsh lines, interesting cubism patterns and contrasting colors.


Today, the art deco style is finding its way onto high fashion nails. Fun diagonals and triangles are being painted onto manicures all over the place. Teal, nude and black are popular polishes for this style. Fun chevron lines and joker-esque patterns are reminiscent of the Parisian deco style.


This style is very chic in purples and pinks! You can make the look soft and flirty with shimmering polish and whites, or spunky and daring with black paint and darker hues. This style is difficult to paint yourself but super attainable and available in acrylic styles.

These deco nails are directly inspired by Piet Mondrian's paintings: Composition II in Red, Blue and Yellow (1930) and Composition with Yellow, Blue and Red (1937-42). Mondrian was a Dutch painter that believed in minimalism during the art deco period. His paintings are infamous and most hand in the Tate Gallery in London.

To get the deco look on a budget, follow these How To guides above. This Youtube video shows a good demonstration on a deco pattern and The Beauty Department also gives great tips to achieve the looks above. Enjoy your new Parisian inspired nails!
October 16th, 2012- The Kim Kardashian Contouring Technique

Contouring makeup is of the utmost importance to any girl that has ever worn any sort of foundation or blush. Contouring, or shading the natural curves of your face with highlights and lowlights, creates a glamorous effect for every occasion. Regardless of the amount of blush, toner or foundation you use, the application must remain the same. Make sure you have good makeup and brushes to achieve the maximum desired effect before you get started! Contouring is all about bringing out your cheekbones and making your eyes stand out.

Kim Kardashian is the contour queen. She has thankfully publicized her makeup secrets to share with the world. You really want to accentuate your cheek bones in any way possible. This makes you look thiner and is overall more appealing to the opposite sex. The easiest way to do this is to apply blush to your cheeks. To make the light pink stand out, you put lowlights of bronzer directly below your cheek and up around your hairline to frame your face and give you a tan, healthy glow. Bronzer should also be applied to your lower jaw line as to round out the top frame of darker makeup. This really frames your face nicely. Last but not least, a touch of bronzer should be applied to your nose and dark eye shadow should be applied to your eyes for a complete contour. To bring out your eyes, make sure the lightest shimmer surrounds the corners.


The contour tactic works wonders for Kim Kardashian. Even glamorous Hollywood stars need makeup! Without the drastic shadows improving her look, Kim looks washed up and sunken in. Her tired look is easily improved with the right makeup application. Kim has great cheekbones and exotic eye features. The contouring brings our her already natural facial features. Watch Kim teach you her secrets herself on this YouTube video or this fan based video for reinforcement.

You can clearly see that Kim K takes the contour even further by highlighting her T-zone, below her nose and on her chin. The lightest parts of makeup should frame your eyes. Her forehead and below her eye sockets are the lighter foundation. This gives you a more awake and vibrant look because it eliminates dark circles and makes your eyes pop. Above are pictures of Kim's process. Be careful to never over apply or pick products that make your skin cakey, oily or overly shiny. Always use a brush or sponge to sweep and blot on makeup so it is thoroughly rubbed in.

Bronzer should always be a shade or two darker than your actual skin tone. You should apply bronzer under your cheekbones parallel to your jaw line, on the sides of the bridge of your nose and on the jaw line under your chin. Blush should be one level above your bronzer on your checks parallel to your jaw line. For a highlighter, apply above and below your lips to really make them pop. Apply a small bump on your nose, brow bones, and also above your blush! Check out this Birchbox blog for more tips!

The last Kardashian tip is contouring, or shaping, your eyes. The majority of your favorite eye shadow can be directly on the eye lid. Pinks, golds and browns are great for this season. Then, be sure to apply the darkest shade to the level just above the lid. Finally, place the lightest shade below the brow and along the corners of your eyes for the maximum effect. Check out this website for Kim's eye makeup tricks of the trade! Happy shading ladies.
October 11th, 2012- Scallops: Not Just For Eating

Scallop nails and makeup are a creative way to show your feminine style. Scallops are an animal of the sea with a soft, wavy ridged shell. Fashion has been mimicking natures natural beauty. The subtle waves now known as "scalloping" have been incorporated into clothing, makeup and nail design. Small waves, repetition and varying colors are all worked into this trend.

You can use neon colors, your favorite polishes or even a palette of shades from your favorite sports team or college! Whatever you fancy, the world is your.. scallop! You can use serrated scissors to cut an outline from paper to be your guide for this trend. Watch this tutorial on how to do your own scallop manicure.

Nude and neutral colors are huge for Fall. Pick up a black, pink, nude or even grey polish to achieve the looks above. Add in some glitter to really make your waves pop! Use the darker colors as a top coat to avoid any see through paint. However, with extra dry time and multiple coats, paint order doesn't matter!

You can also get the scallop look on you eyes! With liquid eyeliner, some paper and scissors, you can get the look above! Follow this How To tutorial to get scalloped! Enjoy your sea-inspired style!
October 8th, 2012- Fall Inspired Nails

The leaves are starting to fall and October is in full force! The foliage is turning orange and yellow and pumpkins are for sale in every neighborhood. The seasonal change is currently inspiring nail trends. Press-ons and painted detailing is chic for this Fall trend as are painting simple Fall colors in creative ways!


Leaves can be painted or glued on to manicures for this look. Paint a solid background of white, orange, grey or brown to provide a contrast for your leaves. Then, mix and match orange, yellows and browns with a tiny brush for your detailed look! Don't have a steady hand? Apply clear polish over stickers or press on styles for the perfect realistic leaves!

The trees are just as stunning as the leaves they produce! This look is even easier to do yourself with a fine black line. Paint yellow, orange or other Fall inspired backgrounds as a backdrop for your details. Let it dry, then paint black splintering lines to resemble eerie trees on an October day.


More abstract styles can be adorable for the season as well. An arsenal of orange, red, yellow and brown polishes are a must for this look. You can give yourself an ombre manicure (see the DIY post below) with Fall colors or you can buy glittering finishes for a party look! You can make your own shapes and lines with any of these colors to achieve this seasonally inspired hand.
October 4th, 2012- Crescent Nails

The fashion empire of Chanel has deemed crescent nails the look of 2012. Crescent nails or "border nails" are trendy for this season. All you'll need is two colors of polish and a VERY steady hand. These two toned nails provide a stark contrast that everyone loves. The best borders are in white and black.

This trend is super modern and slightly reminiscent of art deco style. The round shape gives a soft look while the border can provide harsh lines to show off the shape of your nails. The greatest part of these crescent nails is that you have two colors: two opportunities to match your outfit!


Chanel popularized this look and we love it. Black and gold are very regal, Chanel type colors. But remember, it's breast cancer awareness month! Feel free to show off your pink and silver crescent nails to show your support of the cause!

Go crazy with pastels and glittering polishes for a feminine look! Look through your polish stash and mix and match to your crescent heart desires! Happy painting!
October 2nd, 2012- Ombre Nails Part 3: Fade Your Color

Ladies, Glamour online has turned us on to a new trend in nail design: ombre nails. This look is an easy on to do at home and looks like a flawlessly done manicure! The look is a fading trick that can be done with two polishes of the same color with different tones, or two completely different colors and tones. All you'll need is nail polish, a small makeup sponge and some remover just in case.


A pink or pale undertone fades beautifully into a color of your choice. It gives the effect of a tipped manicure without the harsh lines! If you're feeling more playful, you can choose bright neons and drastically different colors like pink and blue. The subtle fade is a glamorous and playful look.

Achieving the look is not a difficult task. First, you must dampen your triangle sponge, paint your two (or three) consecutive colors from lightest to darkest towards the tip of the sponge, dab it on a piece of paper until blended, press the sponge down firmly on your nail and repeat! Erase stray marks and cover with a top coat to finish!

The look can be glammed up by adding glitter or gold to your color wheel. Nude is a hot trend for Fall so try earth tones in your ombre fade out! You can go glitter heavy towards the tip of your nail to really bring out your fade in.

For more helpful tips and tutorials check out The Beauty Department blog for a detailed ombre description and view this video How To if you're still feeling lost. Happy fading!
September 27th, 2012- Gold Rush

Gold is the perfect shade for eyes this season. Recently, glimmering blond hues have been popping up in eye shadow colors on the runway and after hours. Gold makes any look appear glamorous and is very agreeable with any skin tone! You'll look award show ready every time you apply a gold eye!

This show stopping look first appeared, where most beauty trends do, on runways. The look accompanies many high end looks from top designers. Gold eyes are the perfect accessory to an outfit that has gold trim or accessories. The gold doesn't overpower your natural eye color but still stands out in a crowd. In fact, the gold will pick up natural warm tones, like honey, hazel and brown, in your eye for a sparkling effect!

The look is best achieved using different shadows of gold with varies brushed. You should apply the lightest gold shade first and close to the corners of you eye to achieve a more "awake" look. The darkest of the shadows goes on the outskirts of your eye and a highlighting hue should be applied right beneath your brow. Add dark eyeliner and mascara and you've achieved the look!


Make sure to keep our eyebrows neat for the look. Experiment with different shades and companies of gold shadow to find what works best with your natural skin tone and eye shape. Some golds are harsher for other and achieve a more aggressive look. Other more subtle golds can be worn to daytime events! You must play with different placement and products to find your best look.

The gold shadow is perfect for holiday parties! Watch this video tutorial for more golden tips and feel free to visit this blog for more shadow fun. Gold shadows can be purchased at Stila and of course Sephora. Get gold today!
September 26th, 2012- Don't Forget To Brush... Your Skin!

The essential first step in your daily skin care ritual should be a Skincare Brush! These are professional-caliber brushes that use a gentle sonic micro-massage
action to cleanse deeply. These brushes promises gently clears pores without harsh abrasion
or chemicals. They cleanse so effectively that your skin care product or choice absorb
better!

These brushes can range from $20 to a couple hundred dollars. The main brushes on the market are the Clarisonic Skin Care Brush, the Sonic Cleansing Brush, and the Olay Pro-X Advanced Cleansing System. These classic Skin Care Systems have a flexible, dual brush design and
oscillating movements to loosen and remove impurities while clarifying
the skin. Repetitive motions stimulate blood flow in your skin and wash away residue for a fresh feel! Check out this video for more information on the brush!

Using these brushes help give your skin a glowing appearance. They promise to remove makeup six times better than traditional methods, clear pores and reduces the appearance of pores, clean so thoroughly that skincare products absorb better and produce noticeably healthier looking skin. Try brushing your skin today!
September 21st, 2012- CRACKLE!

Crackle has been a huge hit as of late! The style allows you to express your wild side and let's you experiment with an array of different colors and paints! The crackle effect is achieved by painting a base coat, either one plain color or a variety of colors, and then a top coat of "crackle" nail polish that drys and splits, revealing the under bottom coat!

The top crackle coats come in a wide range of colors such as black, silver and your average rainbow. The most popular tend to be black, silver, and shock value hues of red, blue and purple. The crackle dies naturally and splits in the process. There is no extra tools needed or specific drying pattern necessary! It will appear as a solid top coat and start to divide as it dries!

Choose your favorite polish in your favorite shade and apply as you normally would. You then find a color of crackle you'd like on the top of your base. Many different polish companies make the crackle top coat.Select your favorite brand and try different combinations!

The pop superstar and nail goddess, Katy Perry, opened her own line of crackle polish with OPI. Katy prefers a black base with a glittering top coat as a crackle. Her nails glimmer on stage and are every bit as outlandish as her outfits! You can match either the top of bottom coats to your style and hair!


Other brands such as Mia Secret, Sally Hansen, Pure Ice, and China Glaze are equally effective in their crackle paint endeavors. Their products have neon options for those of us that enjoy colorful hands! The warmer colors are great for Fall fashion.

Shades of teal and mint are hot, hot, hot right now for this season. You have two options for this look! Find a teal base coat and crackle on black, gold, or silver OR you can buy your very own teal crackle and apply it over any shade you like! The world is your oyster!

Rainbow crackle is also a great way to show off your personality and funky flare! You need plenty of polish colors and white or black crackle to get the look above! View these two tutorials to find great "How Tos" to get the look: Lisa Frank Inspired Nails & GlamNailz Tutorial. Get crackin' ladies!
September 17th, 2012- Want More Polka Dots?

Polka dots are this week's trend and they are popping up all over the fashion radar! Dotting your nails with a simple white or colored dot makes you a fashionista this season. Play with colors and patterns to get your nails to wearable perfection.

Pop artist Katy Perry loved her polka dots while rocking hot pink and black colors. You can make yours exactly like Katy's or go for a less daring, more classic look with softer colors and shorter styles.

Try going for a paler shade and doing selective white dots as shown above. You can add them as a cutesy accent to a French manicure style ot do a simple base coat of your favorite color and dot with a white skinny brush.

Feeling bold and wanting to keep some color in your life? Try different bases with the same dot! Paint every nail a different color to show off your wild rainbow side. For those of you with more time, change up the shade and colors of your dots while using a white base!

For the real nail connoisseurs out there, try doing different dots colors on the same nails! Try funky patterns and have plenty of remover handy. Make sure you have a steady hand and an array of colors for this style! Happy painting!
September 12th, 2012- Want More Paisley?

Paisley is the pattern for Fall. Traditionally seen on home decor and clothing, paisley is making its debut on hands everywhere! This culturally inspired look is fashionable and easy to have done in a salon.

The look on nails creates a western effect when accenting certain colors. Traditionally, paisley is printed in white and another staple color. Blue, red, and pink are the most common shades to grace the paisley trend.

Playing with color choice can be super fun for this trend! Skewing from tradition is a really unique way to express your love of paisley. Try a neon summer color or mix and match solids and patterns with different paints!

Darker polishes are more subtle and perfect for Fall. Using black as a base color is a great way to make the look professional and seasonally appropriate. Start my applying a base coat and either paint, or find a press on pattern to achieve the look.

Lighter hues are also nearly unnoticeable and are just as eloquent. Try a pale shade of blue, pink, or green. Mint is very trendy for Fall and is easily translated to this trend. Playing between black and white also gives your hand a very kitsch look as it presents optical illusions to the eye.

However you wish to rock your paisley, express your love of color with your new favorite Plush-approved print!
September 11th, 2012- Pale Nails

The weather is chilling down and so are our nail styles! Pale nails are in style for the chillier months! They're low key, match everything, and easy to maintain. Simple to DIY, this trend needs pale pinks, nude tones and white accents. Some styles in this trend are so minimalist people will think you're going natural!

Feeling like dressing up the trend? Add some frosty details! Glitter, floral patterns and small white decals are perfectly subtle for this trend. Your fingers will look like delicate lace. It's the perfect way to sneak in your white after Labor day.

Lighter hues of pink and white are also in keeping with this fashion. For more try the nudes and neutrals section of OPI, available online and at local Walgreens stores. For a fancier edge on this style, a French manicure is always in style. Check out the "How To" below.

September 5th, 2012- Eyeliner Guide

Eyeliner: The must have tool in your makeup arsenal. But how do you use your liner for the desired effect? Whether you use pen or liquid, color, line and placement of your liner impacts your daily make up look. Styles can range from cat eye, to deep shadow eyes and finally to a classic Audrey Hepburn look. Going hard and intense can look just as lovely as soft and simple during the right occassions.

Most importantly, the area you apply your liner to can effect the appearance of your eye and accentuate certain natural shapes. By placing liner on top and the far low corner of your eye, it makes your eye look bigger and is a great day-to-night look. Applying liner only on top is a great way to achieve a natural, simple day look. Drawing all around your eye can make it look smaller but is very sexy for an evening look. Finally, to be more dramatic, dray the line out and down or down to achieve an Egyptian or cat eye effect.
 |
| Different applications on a model |

Never underestimate the importance of color! Different colored liners accompany any outfit and are super fun to play with.The placement of the liner doesn't change, but mix up darker and lighter shades of your favorite colors to compliment any outfit. Glitter and shimmering liners are available at local drug stores and are an amazing look for any Happy Hour.
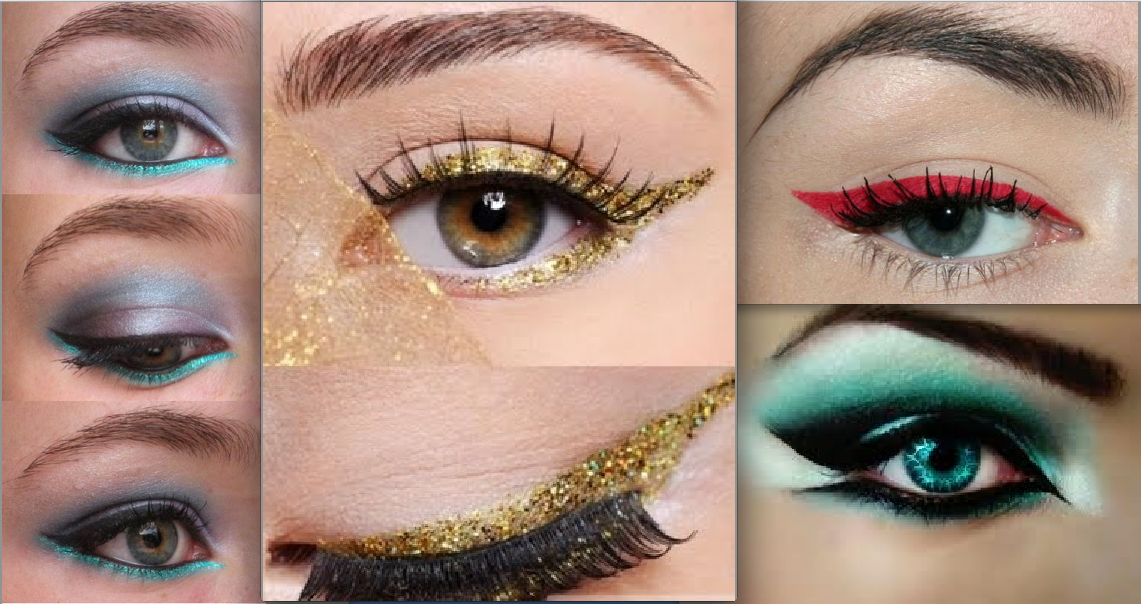
Feel free to experiment with amount, placement, and color! Play with false lashes and different shadow products. Don't forget, it all washes off so be bold!

August 28th, 2012- Thorny Hands

It's time to be bold. Nails that stand out with a punk edge are keeping up with our spiky trend on the main page. These nails really show your rocker side as they are Bad to the Bone. Black is normally the base color for this trend. Once applied, place your own spikes or studs to the manicure with nail glue or paint. Silver and gold give it the glamorous look rocked by the Kardashians and Rihanna.

Not feeling as Goth-inspired yet still want to jump on the bandwagon? Try a lighter color with the same studs and spikes for a more playful look. These nails are perfect for an edgy day look. Go buy some studded nail accessories at Dollar Nail Art!

August 27th, 2012- In Love with Sailing Away

Were you in love with our Homepage nautical trend? Couldn't get enough? Great! We have a shore bound trend for nails. Try striping your own nails for a sailor look! You can use white out or paint strips using small tape. Use a navy blue coat as shown above or white base with navy stripes! Feeling crafty? Mix it up! Keep to the color patterns of red, blue, and white. Feel free to experiment with striping, painting whole nail, or even doing small marine life paintings! These little hearts are darling and look perfect for boating!

Hope your manicure is all smooth sailing.
August 21st, 2012- Map Nails

Fabulous DIY manicure idea: Maps! Do a New York Subway or your home town... it's up to you.You can do it with scrapbook paper too!
Here's a step by step:
1. Paint your nails white/cream
2. Soak nails in alcohol for five minutes
3. Press nails to map and hold
4. Paint with clear nail polish
immediately after. Enjoy!

Still not clear? Here's a Youtube tutorial!
August 16th, 2012- Youthful Nails

Inspired by Katy Perry’s kitsch style? Good, because it’s
time to let your admiration shine on your nails. Youthful nails are perfectly
playful for a retro style. Bows, cartoon characters, and cheeky designs are a
fun way to show your personality.

Choose your favorite show, movie, or
fictional character to adorn on your hands!
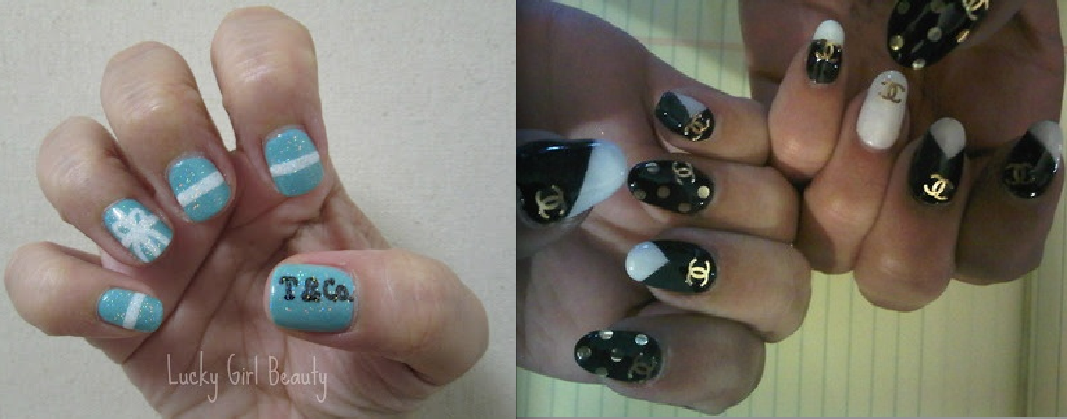
A fabulous way to make the trend high-end is include your
favorite fashion designer emblem or color on your digits. Tiffany, Gucci, and
Prada can be amazing nail details for this trend.

Try this Yin-Yang DIT manicure inspired by Katy Perry on the
cover of Elle magazine.
August 15th, 2012- Garden Hands

Loving our floral trend on our
homepage? Well, you’re in luck, the trend has made it’s way over to nails. That’s
right, ladies! Nail art is getting floral!

Try experimenting by giving your
manicure a wall-paper effect of blossoming nails. You can try going every other
nail with a solid pattern in between or even picking your favorite bud for all
five nails. This works for your feet as well!

If you have a steady hand, you
can try it out yourself or buy acrylic and paint beforehand. It’s recommended just
to paint an edge of a flower and not the whole face. Personally, I would leave
this look to a professional but that’s what remover is for!

August 10th, 2012- Let Me See Your Peacock

Feather print clothes are all the rage this season and have tickled their way into makeup trends. Peacock inspired eyes have been popping up on the summer scene for a bold and refreshing night look. An array of sparkled green, electric blue and subtle gold tones have been mixed and matched for a peacock style look that makes any eye color pop.

The look can be achieved with just the peacock color palette, but if you're feeling crafty and have ample make-up time, you can try a more bird-like look with eyeliners. Just make sure you play down your look with a black dress or one tone dress to really accentuate your new eye look. If your outfit looks too busy, this look could be overkill.

August 7th, 2012- Hybrid Manicures?!

After five years of development, Creative Nail Design
has created a revolutionary nail product called Shellac Hybrid Nail Color. It
applies just like regular polish yet wears flawlessly for up to two weeks with
gloss and shine. A professional must apply the polish; first in a base coat,
then two color coats, and finally a finishing top-coat. The
colors are hypo-allergenic, and “3-Free” – no formaldehyde, toluene or DBP. No
buffing is required! After each coat is applied the gel is cured and hardened
under UV light for an instant dry. Although it also promises no chipping
or peeling, you will need to come back to the salon to get the manicure or
pedicure off. The price of the procedure is, of course, double the price of a
normal manicure or pedicure but many argue that it’s worth every penny.

Its “no
smell” “long lasting” wear is a salon must-have and has promised to wow all the
DIY manicurists at home. Shellac
Hybrid Nail Color debuted on runways for Marc Jacobs and Jason Wu earlier this
year and launched in 12 shades in
2,000 salons this May.
August 6th, 2012- Tribal Patterned Nails

If you enjoyed the tribal trend on the main page, get ready for a pleasant surprise. The safari look can be painted to perfection! This look is slightly harder to accomplish with just a steady hand and some tape. Ladies, it's best to trust this style to a professional or press-on patterns. Go print crazy!

August 1st, 2012- #teamUSA!

Patriotism has taken the fashion world by storm! What's even better than watching America bring home a gold medal? Displaying YOUR nationalism on your fingernails while cheering from home! We've added an twist to the examples above! Why not try out flags and colors from countries of your own heritage by browsing your favorite nail polish providers?! Try these fabulous styles to rock your favorite country's colors while cheering on your favorite Olympians!
July 31st, 2012- Olympic Fever
Feeling inspired by watching the world's best athletes compete? After getting tips on how to trend up your workout on our main page, your nails can follow suit in the spirit of the games. Select your favorite from these styles and try one out! If you mess up, don't worry, nail polish remover is always handy!

July 30th, 2012- Grade A Manicure
Give yourself a "Grade-A" manicure! By using simple nail
polish and feathers you can create a unique look that has a natural edge in
six easy steps.

Step 1: Paint your nails with a base
color, any color will do. Let dry.
Step 2:
Apply a thick top coat.
Step 3: Take a feather (packs can be
found at Michael's Arts and Craft's store for about $1.00) and apply it to the top of the base of your
nail.
Step 4: Press the feather into the top
coat.
Step 5: Using manicure scissors, cut off the end of the feather. Trim to get the feather close to where your nail
ends.
Step 6: Apply a thick top coat over
the nails in the direction of the feather
Step 7: Be ready to show them off!
July 20, 2012- Weekly Trend, Flashing Neon!
This picture was found when I was looking for different pink lip ideas for make up! This lip is screaminggggg!! And that's a good thing! This entire look is beautiful to me!

I don't have to say too much about these!! They are FANTASTIC!!

July 16, 2012
When you have fairly clear skin, you shouldn't ever cake on loads of foundation, because it will instantly do to your skin what others use foundation for- create an instant break out.
While you may not need foundation, a bronzer is the perfect finish to a made up eye and colored lip! It blends all areas of your skin and plays off your natural glow!
Check it out:

July 11, 2012 Aaliyah's MUA Rocks!!
(cont'd from main page)
Here are some more pictures of the beyond gorgeous Aaliyah from a couple of her videos! I really want to try some of these just to challenge myself! The thing about her make up is she set a lot of trends that are becoming popular today! For example, in the second picture, notice the orange eye color with the blue liner peaking from the outer corner, not to mention that striped orange lip! That is VERY popular in the make up world right now- blending colors on the lips!
 |
| Effortless Beauty! |
 |
| GORGEOUS!! |
 |
| That smokey eye is SERVING! |
 |
| That eyebrow and peak of white eyeliner on the inner bottom corner! |
May 23, 2012- Nude Lips

Since I've gotten back into make up, I've been big on trying things out! While a nude lip is something that should be able to be worn with anything and should complement every complexion, it doesn't. Just in choosing your perfect shade of red, you have to be conscious of your perfect shade of nude!
I found this particular color about this time last summer! Every time I would try to wear it, something just wasn't right about it! I couldn't figure out if it was the consistency, the matte, or what. I kept trying, then finally put it at the bottom of my makeup trunk, and just figured it wasn't for me! Recently I was headed out and decided to give it another whirl! The thing about lipstick that I learned is, it isn't the color that could be wrong, it could be the application! And that is what is was for this nude color! My hand was way too heavy in applying and I would have way more on than necessary, and it just wasn't going to work for me that way. While heavy application may look great on some, it doesn't for all, and that is the secret to all makeup application!
And I love drug store brands, as much as labels, so it shouldn't be surprising that this color is by CoverGirl! "Sultry"

May 02, 2012- [cont'd from main page] ... Nail Trends
 |
| This is my cousin/sister/ friend's stiletto nails! This trend was soooo hot! She even got hers with art design! |
Chartreuse nails are taking over as well! What makes a nail chartreuse you ask?! It's simple! The polish! This specific polish is a couture gel, with an enamel finish! It's great for photographs because the pigments still pop! And perfect for every day life because it doesn't chip as easy! The popular colors are in the green and yellow family because of the new neon trend that is going around so heavy right now! However, other colors stand up to the chartreuse standard as well!


Tis true, fashion always has its way of coming back! The classic red lip came back full force about 2-3 years ago, and now the classic red nail is back like its never left! I ADORE a nice polished red nail! It's so glossy, classy, and effortless!

One trend that I don't think will ever go wrong or lose it's value is a nude nail! And while I'm on the subject of nude, I'll bring up brown as well! I'm a brown girl, and still LOVE a great brown/ bronze nail! It's my version of nude! It just adds an extra pop factor without even trying!


